

Starting your own business is an experience beyond words.
And if you’ve decided to give your dream business idea a start, let me just tell you — it’s one of the best decisions of your life.
Welcome to the world of entrepreneurship!
OR even if you’re already running a business and want to take it online with Shopify, just know you’re on the right track.
Shopify is one of the best eCommerce platforms in the world. I’m saying this because I built my first-ever eCommerce store with Shopify — and have helped others build their Shopify stores, too.
Honestly, when I built my first Shopify store, I made a few costly mistakes (or say learned some great lessons). And I did some awesome stuff that I’m proud of. After all, that’s what entrepreneurship is all about.
So, here’s your step-by-step guide for starting a Shopify store—the right way. I’ll also share some important aspects you should consider when starting your first online business.
Let’s get started with – All things Shopify!
What is Shopify and why should I use it?
For beginners, let’s understand –
What is Shopify?
Simply put, Shopify is a platform that allows you to create an online/eCommerce store to sell your products or services globally.
In a bit technical terms, Shopify is a SaaS (Software as a Service) company. It provides you with software to host and build your online store—along with the infrastructure required to manage your business operations such as product sourcing, marketing, shipping, payments, etc.
Side note: Although mainly known for creating online stores, Shopify is not limited to online stores only. Shopify also has another SaaS product—Shopify POS—that helps brick-and-mortar businesses process their transactions and payments.
Why should you use Shopify?
Millions of businesses all over the world trust Shopify. Shopify merchants from 175 countries have contributed more than $444 billion in global economic activity.
Here’s a brief summary of the key benefits of using Shopify:
Great combination of “powerful features” and “ease of use”
Typically, advanced software are complex to learn. That’s not the case with Shopify. It’s fairly easy to learn in a short period.
Best-in-class merchant support
I don’t remember how many times I contacted them in the past couple of years, but I do remember having many great conversations with their support staff. They truly care about you.
A ton of free resources to learn the platform
What makes Shopify easier to learn is that there’s a lot of high-quality information about the platform. YouTube videos, blogs, help center articles — you name it.
7000+ Shopify apps to increase your store’s capabilities
From building and designing your store to marketing and upselling products to your existing customers, there’s an app for all your needs — free and paid.
Shopify theme store with many gorgeous themes
When you have great theme options, designing your store becomes easy. And Shopify has plenty of them — again, free as well as paid.
Community support across the globe
Last but not least, the Shopify community is HUGE. You can get help from like-minded business owners and other experts through communities on many different platforms — Shopify’s own community forum, Facebook, Discord, etc.
I’m part of different Shopify communities and have seen people helping each other to resolve issues, providing guidance on what worked for them, and so on.
Talking of the Shopify community, I also love the way Harley Finkelstein — President, Shopify — regularly interacts with Shopify merchants and other community members. I admire him so much for showing immense love and support for the community.
Little things like these go a long way!
A Step-by-Step Guide to Starting a Shopify Store:
Okay! It’s time to get into the ACTION mode now!
But first, let’s set expectations — I don’t like to claim that a Shopify store could be built and launched within an hour or a day. (Yeah, you’ll hear people saying such things, especailly on YouTube thumbnails!)
Nope! That’s not how things work in the real world, in my opinion.
I mean, technically, you can do it. But I won’t recommend you do it if you’re looking to build a business from a long-term perspective.
You see, you can set up an “online store” within a day but you can’t build a “business” within a day.
Give it the required time. Consider all the critical aspects of your business. And at the same time, don’t over-complicate things by overthinking every little thing.
It took about 5 months to launch my Shopify store, but honestly, I think it should’ve not taken that long. (Some lessons are learned the hard way.)
So, throughout the guide, I’d also cover what you should avoid to ensure you don’t spend time unnecessarily.
But again, I’d take at least a couple of months to build and launch a new store from the ground up.
Step #1: Start with planning and budgeting
Running a Shopify store requires a reasonable amount of time and money.
Yes, it’s obvious! But I still need to mention it because some people may get misled by some ‘clickbaity’ titles saying — “Start your Shopify store with NO money!”
Again, that doesn’t work either!
So, it’s crucial to go with proper planning for the business itself and the financial aspects involved in it. By the way, this is not to discourage you. You got this!
I’m just making you aware to be financially prepared for at least 6 months to a year in case you’re planning to go fully into it. Make sure you have other source(s) of income while you are building your business. (A lesson from my own experience.)
That said, the great thing is — Shopify recently introduced a new pricing structure. And it’s very beginner friendly.
First, you’re offered a 3-day free trial. Then, just $1/month for the first one month. After that, a Basic plan starts at $39/month (if billing monthly) or $29/month (if billed yearly). The Basic plan provides all the necessary functionalities to build and start selling on your online store.
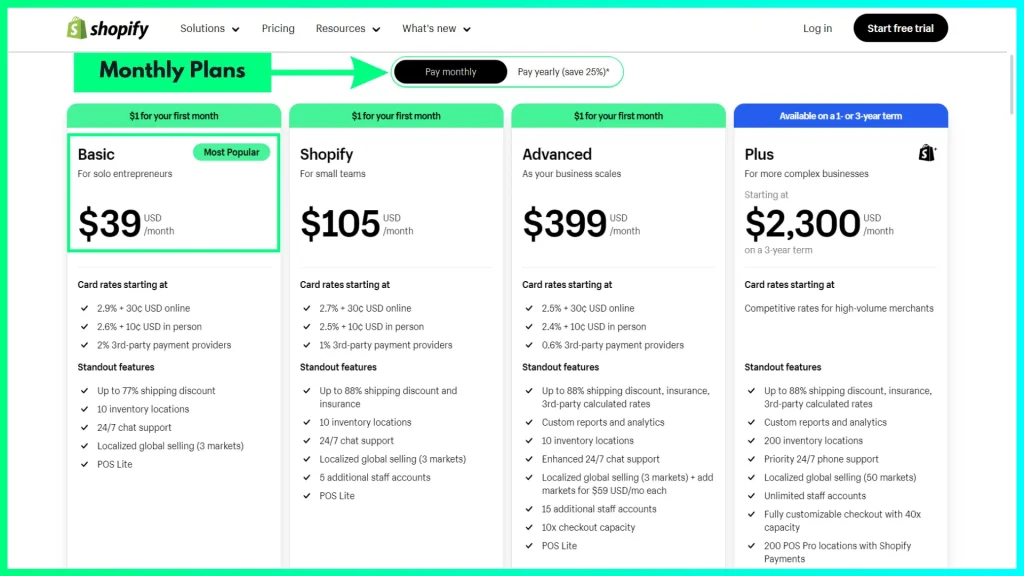
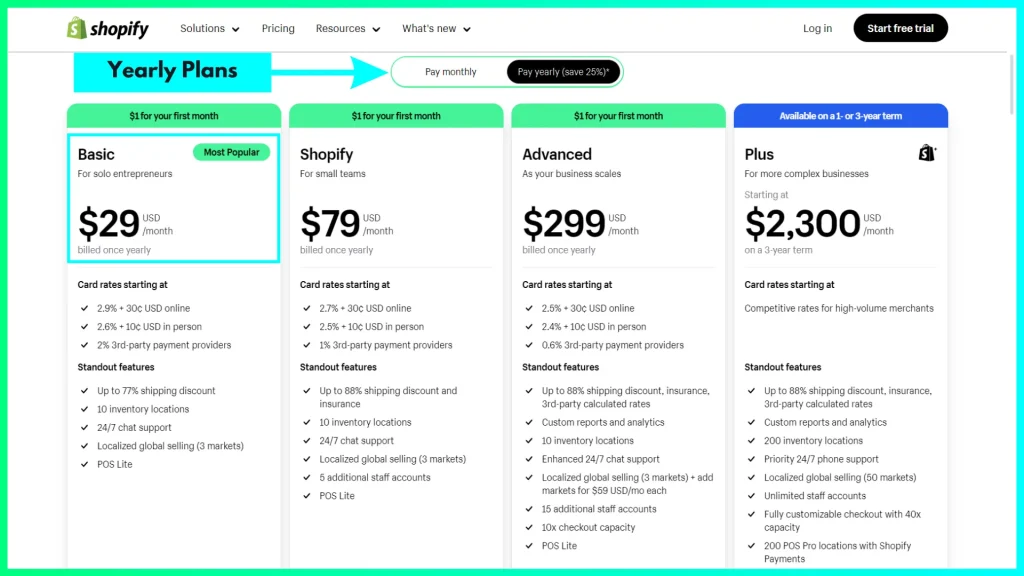
On top of this, if you want to add some paid apps to your store, it may increase to your monthly bills. So, estimate all the fixed and potential costs (including marketing and ads) — and be prepared for them.
Even if you want to start a dropshipping business, I’d suggest being prepared with a budget of at least $1000-$2000 (USD) to properly manage your store and its expenses for the initial 5-6 months.
Step #2: Brainstorm the business idea
What to sell?
This is where you need to keep your heart and mind in sync.
First, the business should be aligned with your passion and values. Second, it has to be a lucrative business model, of course.
So, this requires research and critical thinking.
If you feel stuck and are not able to decide on the business idea; go out in the market (and this could be virtually too), engage with people and communities, observe things around you, and then figure out —
1. What common problem(s) are faced by people that you can solve through a product or service?
2. What’s something that can bring more joy, entertainment, comfort, or happiness in people’s lives? (Not all businesses are built to solve the hard problems! Otherwise, Netflix wouldn’t exist, if you catch my drift.)
If you could figure out an answer to any of these questions, that could be your business idea!
I’m creating an eBook on the best eCommerce business ideas. Make sure you subscribe to my newsletter to get a free copy when it’s launched.
Be specific — as much as you can.
There are so many business categories, and you should drill down to find out what exactly would be your finished product or service.
You may perform research at each fundamental level: Industry, business category, niche, and specific product or service.
Here’s an example for your reference:
Industry: Clothing & Apparel
Business Category: Online Retail
Niche: People passionate about sports
Products: Sportswear items such as track pants, sweatshirts, sports t-shirts & jerseys, etc.
Step #3: Research the market and customers
This step kind of goes along with the previous one. You have the business idea and finalized the product/service you want to sell. Now, It’s time to validate them through further research.
Analyze the market demand for your product.
When the initial idea hit your mind, you might think your product will sell like anything.
But you need to validate the idea through market research and see if there’s actually enough demand for what you want to sell.
The best way to validate the idea is to ask your target customers. From asking your friends and colleagues to conducting an online survey—you can choose any suitable method.
Research the ongoing trends and see if there’s a long-term business in it.
Understand your target customers.
Ask yourself these questions —
Which platforms do your customers prefer to engage and express?
Where do you want to sell? Locally or globally?
How much are they ready to pay for your product/service?
Watch out for your competitors.
Know your competitors in the market, research them, and figure out how can you differentiate yourself from them.
Find out — what’s your Unique Selling Proposition (USP)?
In other words, why should customers buy your product and not theirs?
Helpful Resources: Free Tools to Perform Market Research
- Google Trends – lets you analyze the popularity and trends of the search terms related to your business idea.
- SurveyMonkey – an online survey tool to collect and analyze feedback from your customers.
- AnswerThePublic – a tool that uses data from autocompleted keywords on search engines like Google to generate consumer insights. You can use it toward your product validation.
- Quora – a platform where people ask and answer questions about different challenges they’re facing or any information they’re seeking for specific purposes.
- Reddit – a network of different communities that can help you dive deeper into the various interest and hobbies of your target customers.
- Amazon – Yes, you read it right! This eCommerce giant can also help you research the market for your product and the pain points of your target customers by checking product reviews on its platform.
- Statista – an online portal that provides data insights and trending statistics for about 170 industries.
Step #4: Business Name & Branding
This may seem like a trivial aspect to some people, but it is one of the most essential steps of this entire process. Your store’s name and branding represent your brand’s personality.
Choose your brand name wisely—with the future in mind.
You can change many aspects of your branding in the future — like logo, color scheme, tagline, etc. — as and when needed, but you can’t change your brand name the same way.
Be creative with your brand name.
At the same time, don’t feel completely stuck for days or weeks. If needed take help from a name generator tool like Nameflix to generate some initial ideas or words. And then, give it your own creative element.
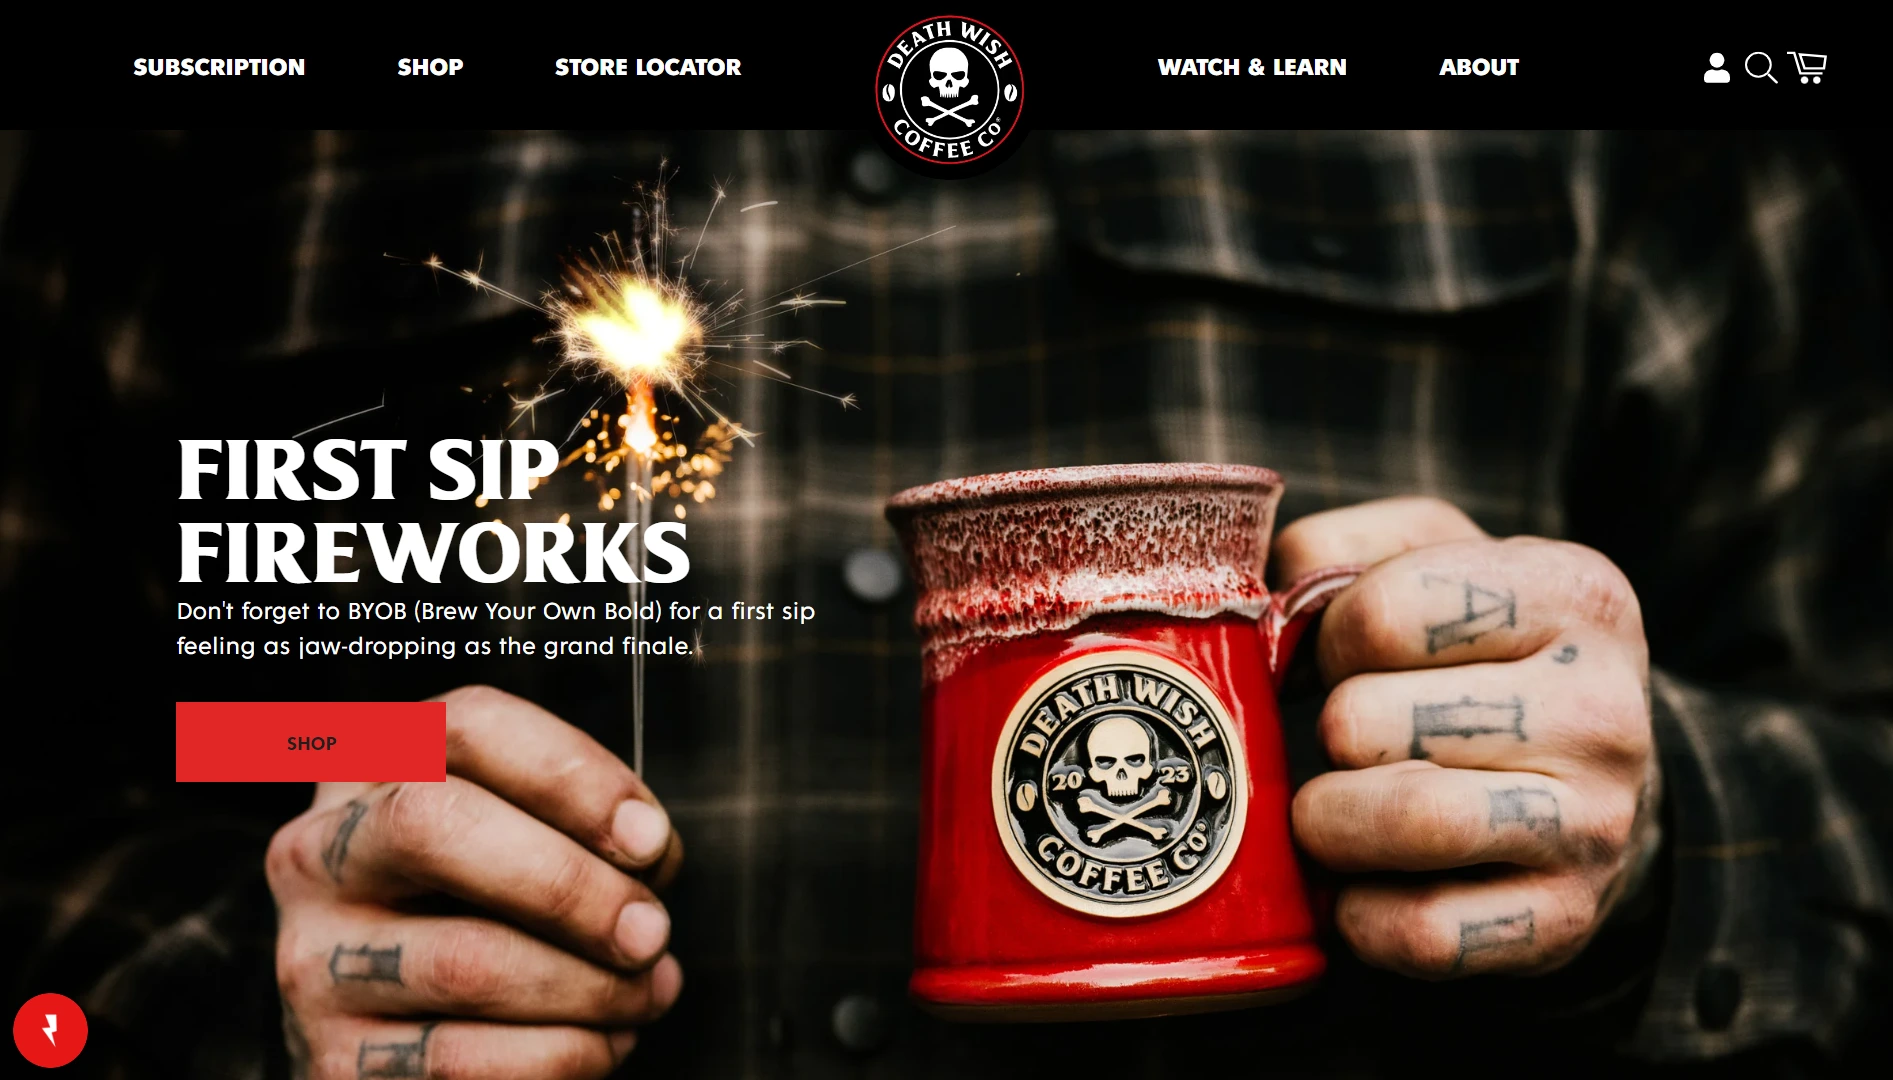
When talking of popular Shopify brand names, it’s hard to ignore Death Wish Coffee. And if you’re a coffee lover (just like I am), go ahead and visit Death Wish Coffee and support the community. 💚
Check the domain and username availability.
While deciding on the brand name, it’s important to see the availability of the domain name. And try to get the exact same name on social media platforms as well.
For example, ForMissionX has the same name on all the platforms — domain name: formissionx.com, Twitter handle: ForMissionX, Insta username: ForMissionX, and the Facebook page: ForMissionX. This makes it easier for your customers to find you on the Internet.
Side note: I used GoDaddy to buy the domain name for my Shopify store. But you have other options too. I chose GoDaddy because it was a bit less costly than the Shopify domain and it easily connects with Shopify.
Other than these options, in general, I also like Namecheap to buy domain names at affordable rates. It may just add a couple of extra steps to connect with Shopify but more affordable than both—Shopify and GoDaddy.
For those who already have a Shopify account, this is how you can buy a domain name from Shopify:
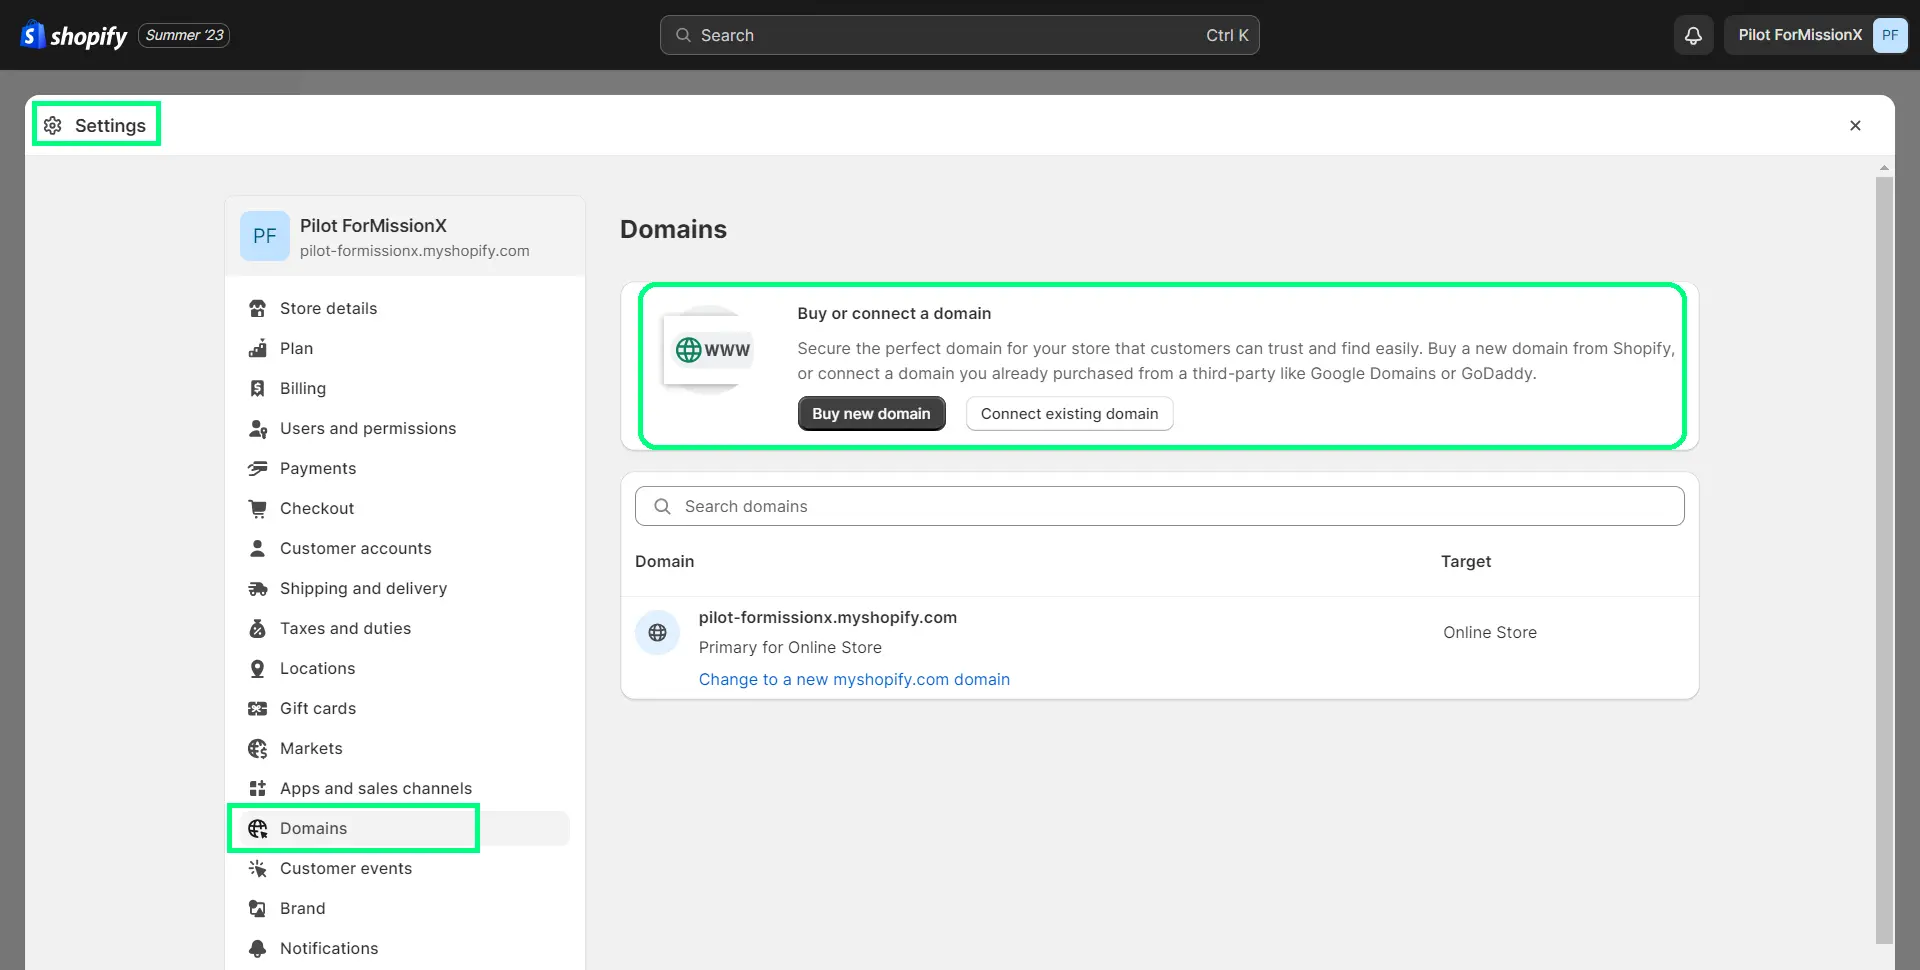
In Shopify admin, go to Settings > Domains, and then click on the Buy new domain button.
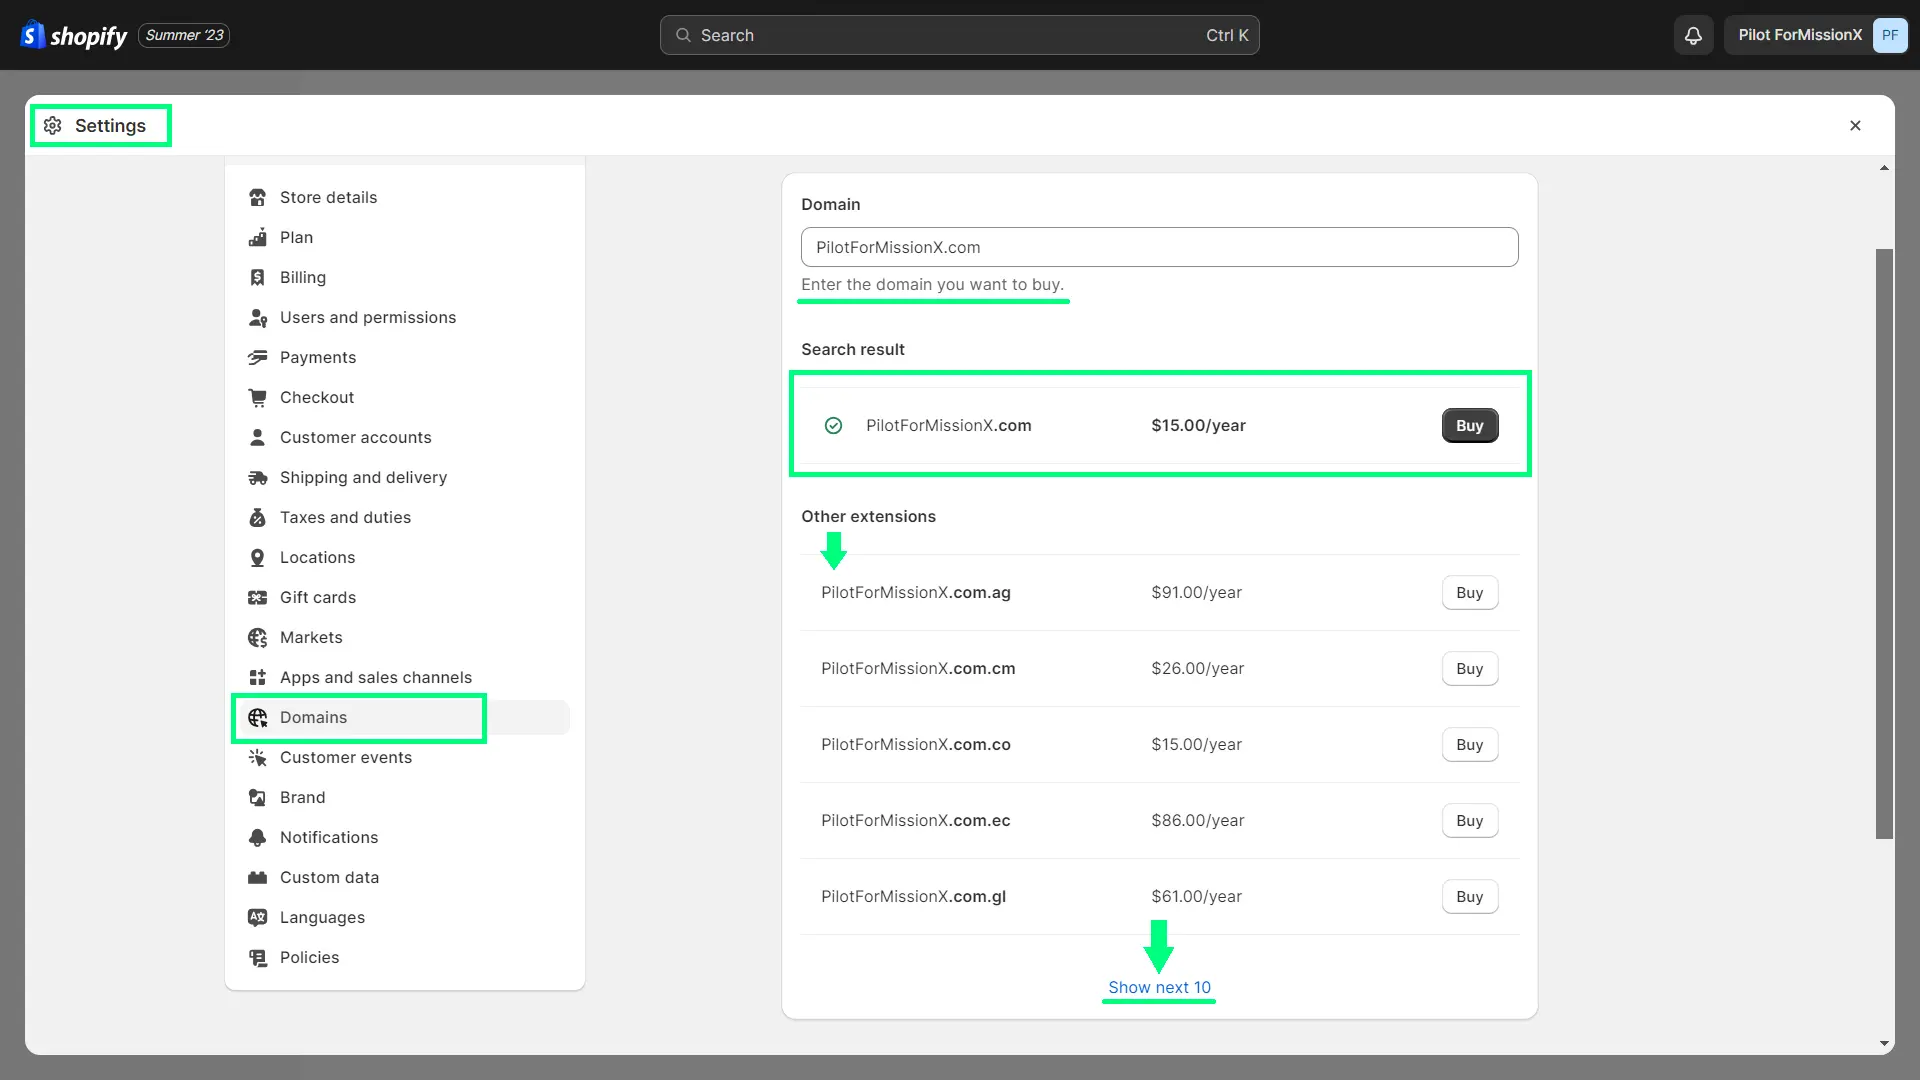
On Shopify, typically, a “.com” domain costs around $15.00 per year. As I mentioned, it’s a bit more costly than GoDaddy and Namecheap. But of course, it’s the easiest option to connect with your store.
Maintain your branding consistently across all platforms.
It’s recommended you keep a consistent and cohesive color scheme across all the platforms — your website, social media profiles, communities, or any other place where your brand would appear.
Design two versions of your brand logo.
Create two types of brand logos—one rectangular shape and the other one square shape.
A rectangular one would better suit your website header. And square one would be good for your website favicon and social media profile picture.
Step #5: Register your business
Rules for business registration may vary from country to country.
In general, giving your business a legal structure and identity could be very helpful to operate your business smoothly.
For example, when you require to configure a payment gateway on your store, they may have certain requirements regarding the proof of business. If you register your business with your respective government body, it helps you configure a payment provider easily.
Also, if you’d like to create a separate business account in a bank, they may have certain requirements for business identification. So, it may help in this case as well.
For more info, you may find these resources helpful:
- How To Register a Business in 5 Simple Steps (2023)
- The 4 Most Popular Types of Businesses and How To Choose One
Step #6: Shopify Account Creation
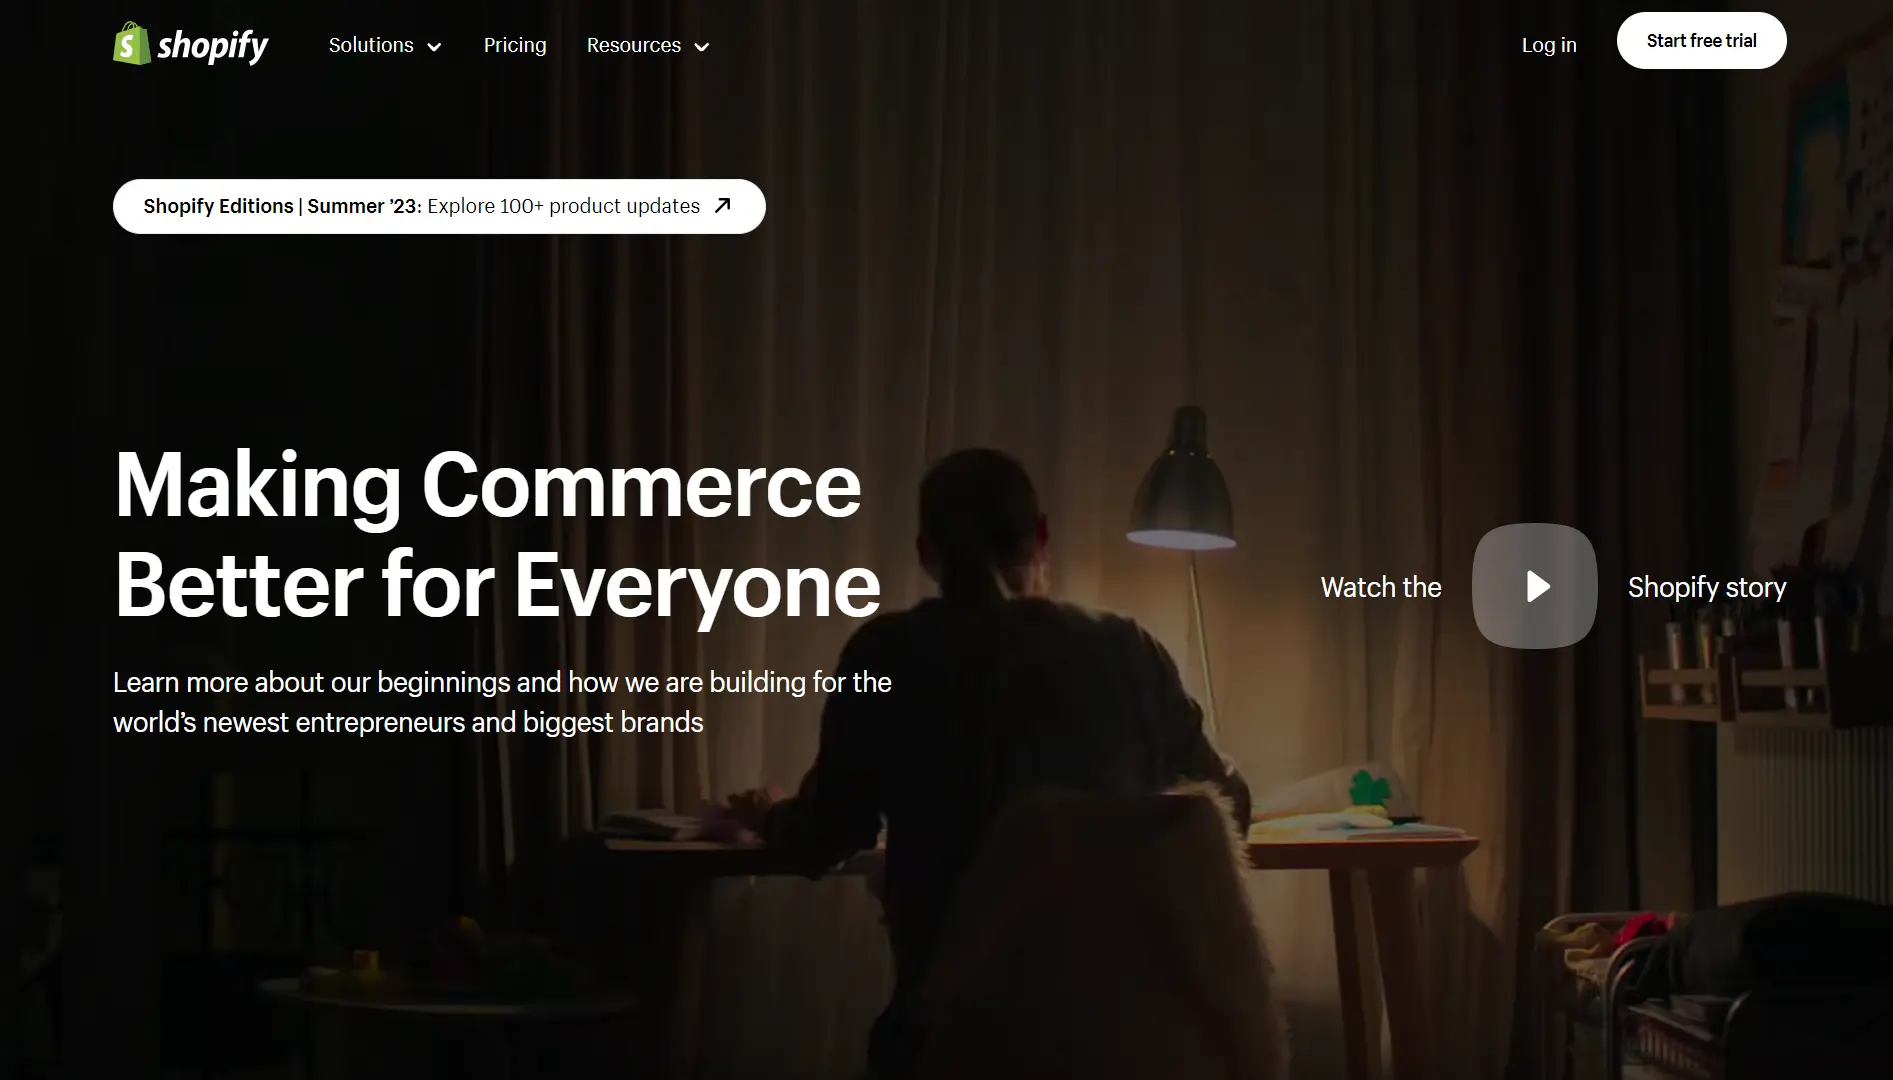
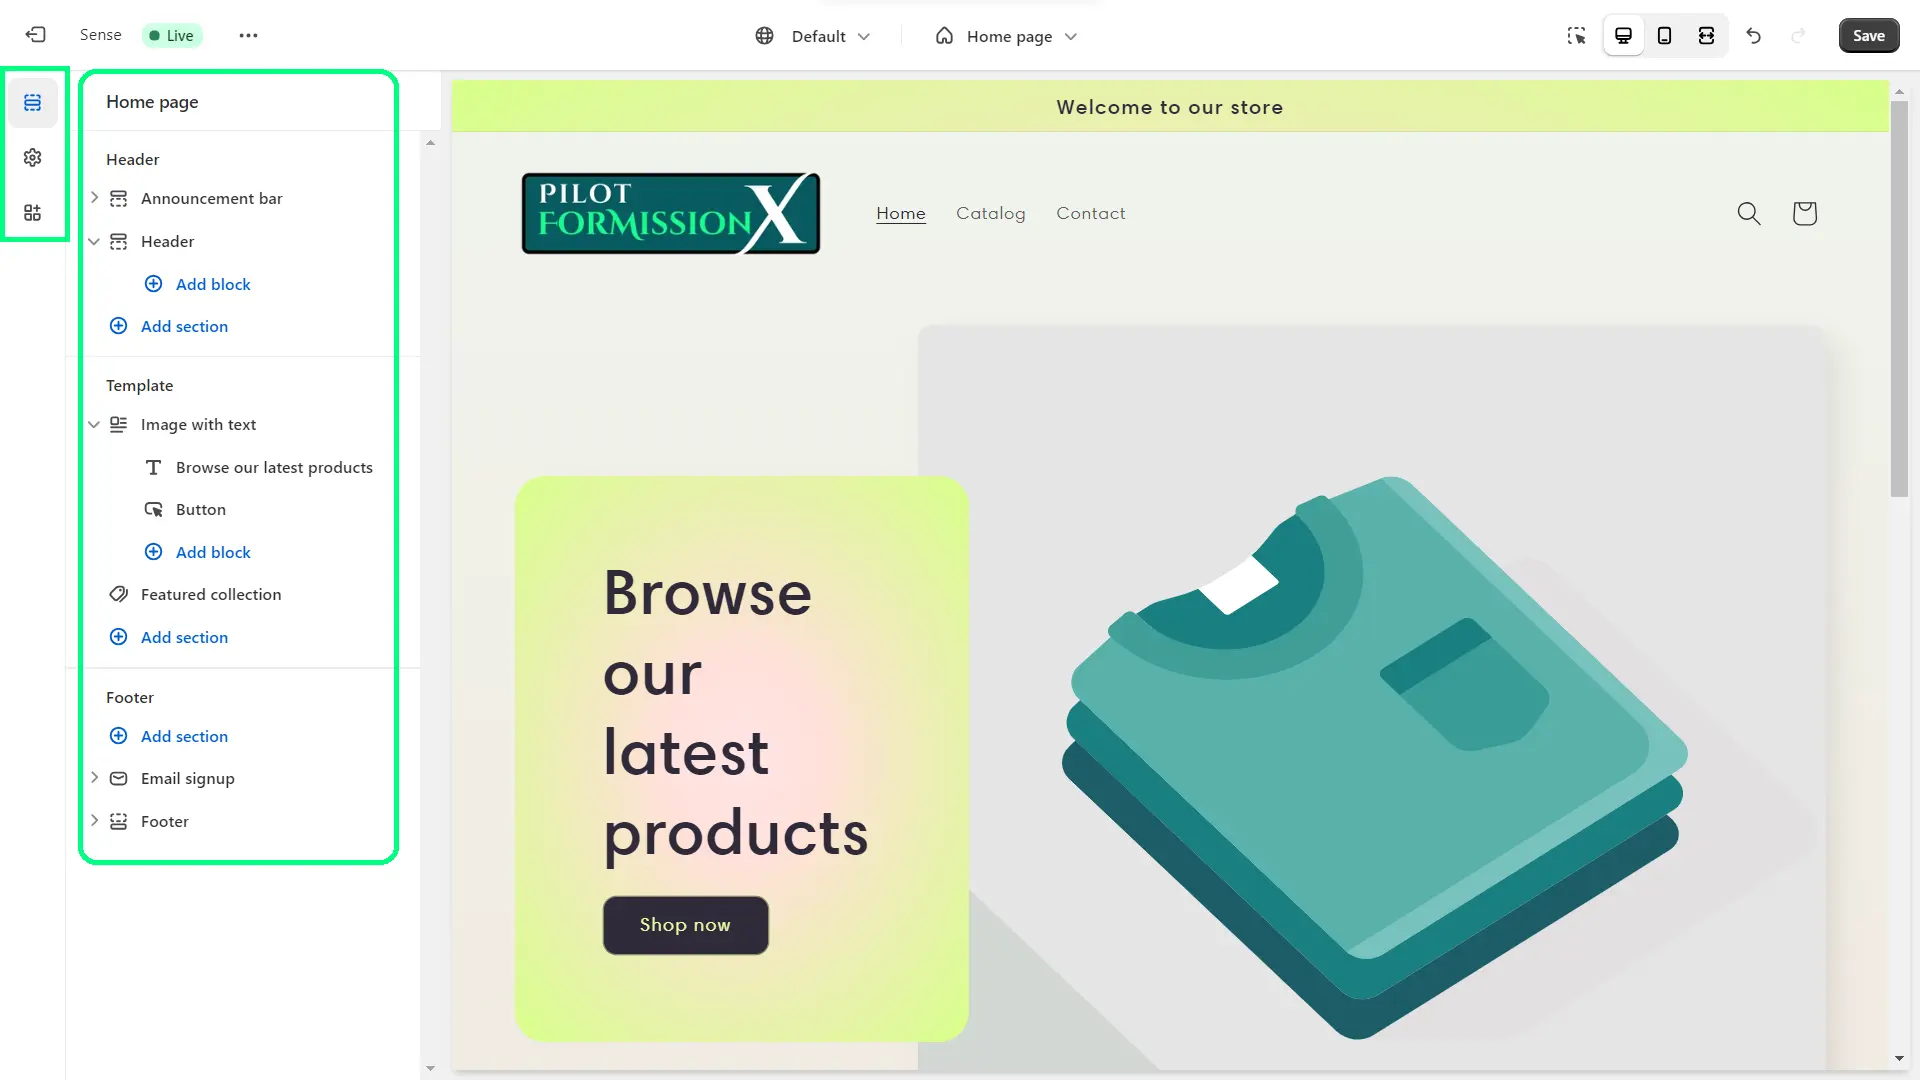
You can begin Shopify’s 3-day free trial. Go to shopify.com and you’ll find a button — “Start free trial” as shown below in this image.
Follow simple instructions to fill in the details such as your sales channel, store name, country, email address, and password. Once you enter those details, your store will be ready to customize in a few seconds.
Helpful Tip: Create and Use Checklist [ + FREE Template]
Once you sign up for the Shopify free trial and start exploring the platform, you’ll realize there are many different settings, apps, and other requirements you need to take care of.
But don’t panic! If you work systematically, you can manage everything smoothly.
When I started working on my Shopify store, I realized I need to create a checklist of all activities and keep track of the progress. So, I created an Excel file — “Store Readiness Report”.
This report gives you better visibility of how much work needs to be done and turns your task management into gamification. It also encourages you to keep increasing the % of your store readiness for the launch.
Step #7: Configure Shopify Settings
So, here comes a lengthy but critical task.
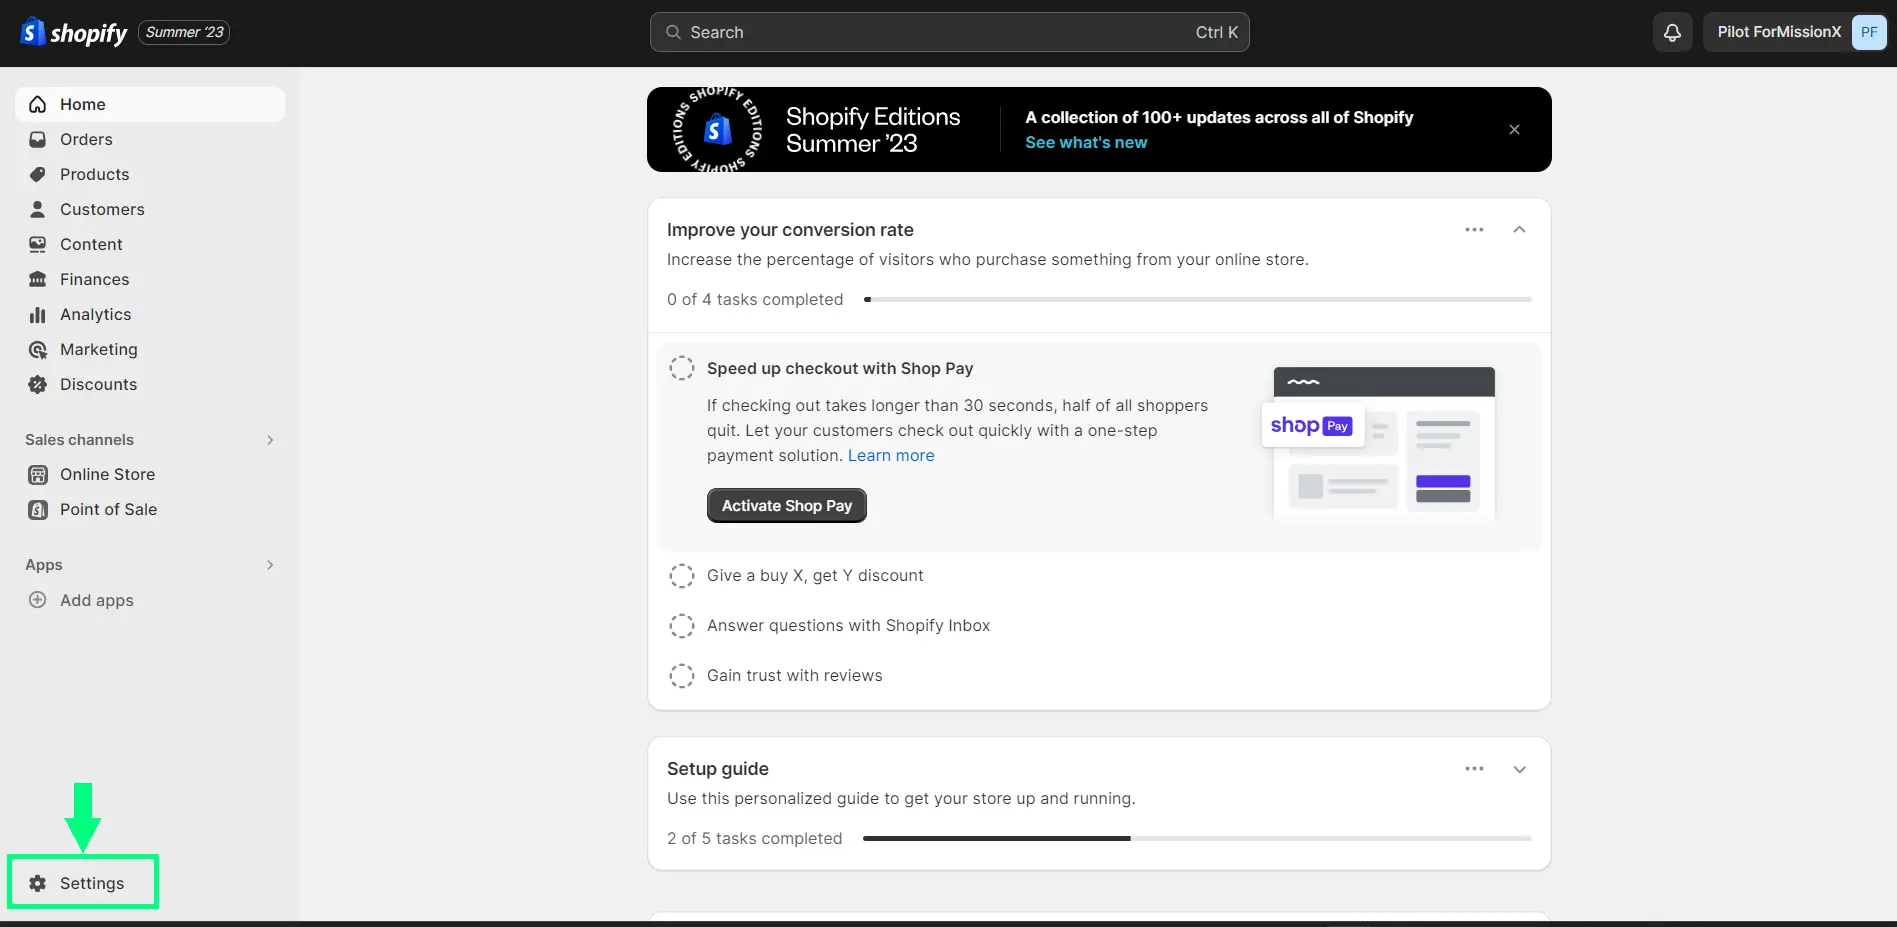
It’s time to work on the store setup process. In your Shopify admin, you’ll find the “Settings” option in the bottom left corner.
Once you click on “Settings”, you’ll see many different tabs. (Side note: I’ve covered all these tabs in the Store Readiness Report.)
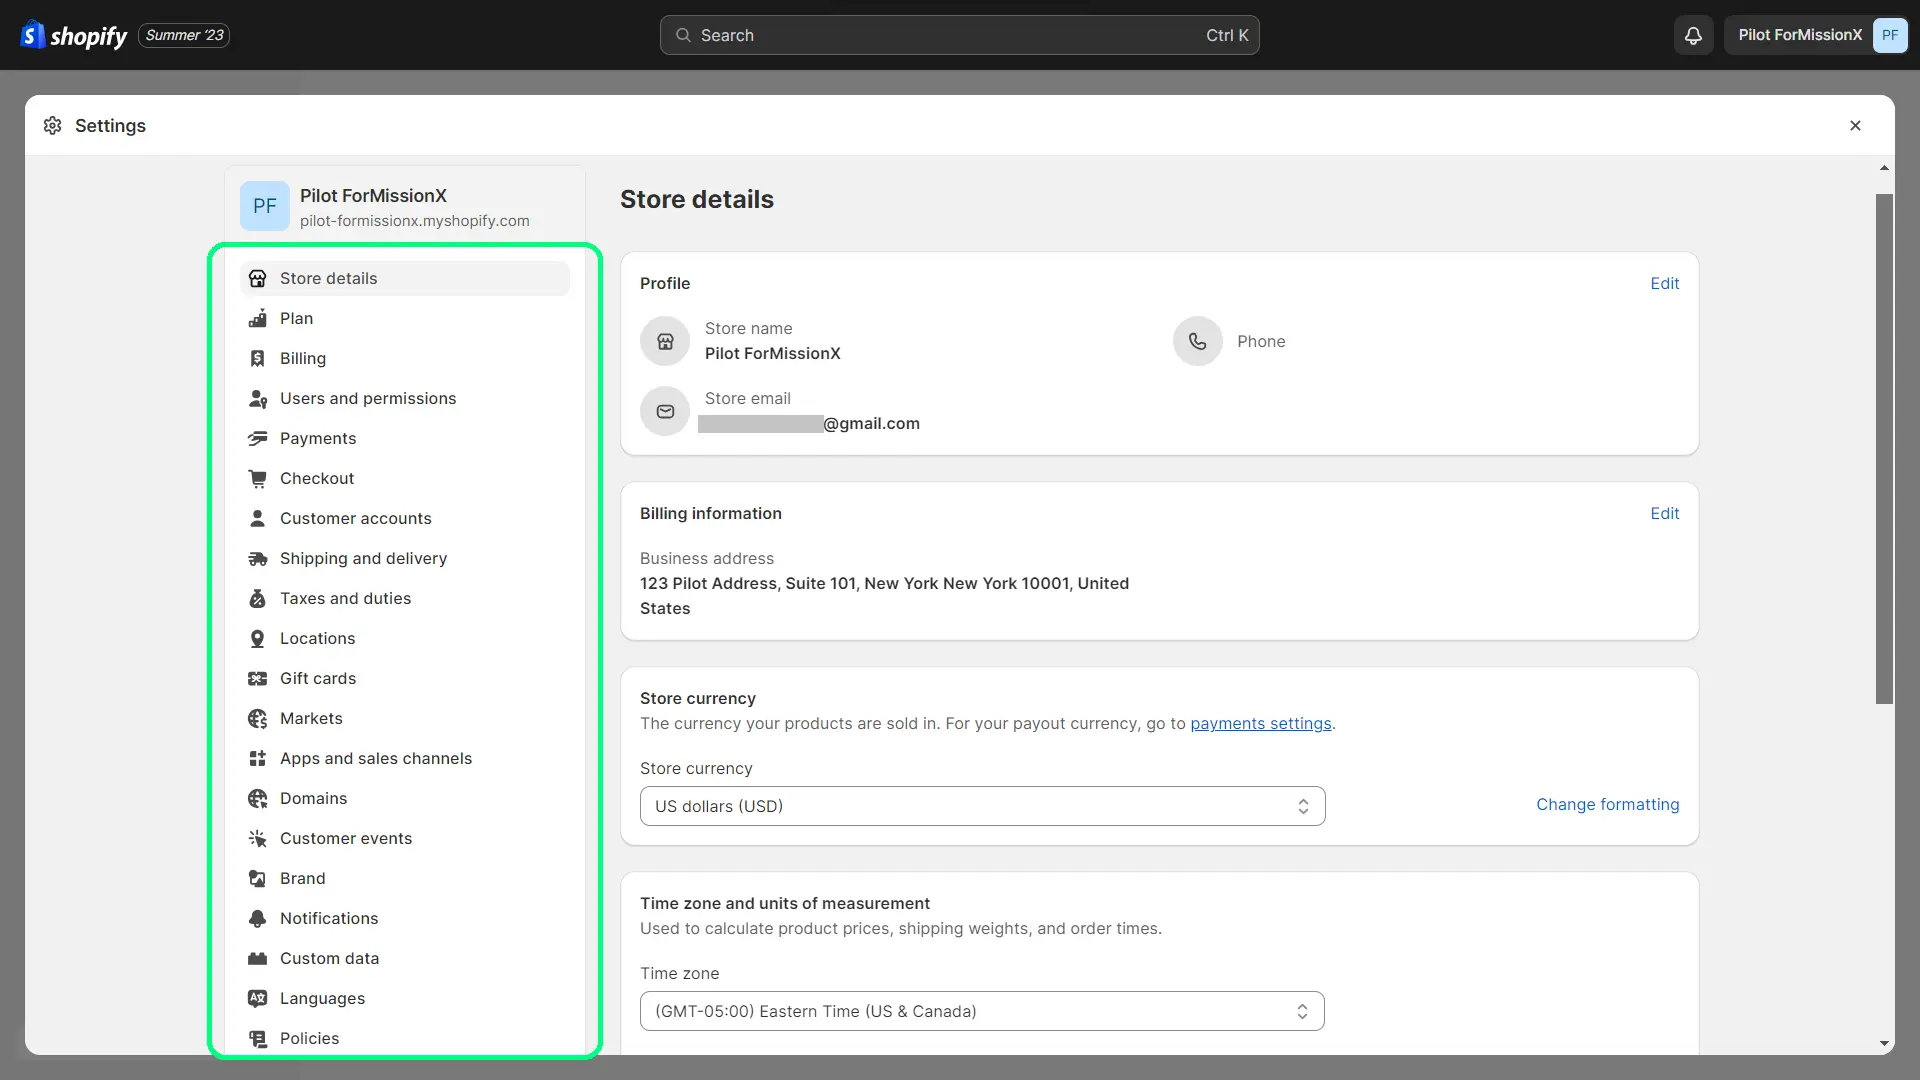
Go through all the settings and make sure everything is set appropriately.
Here are some of the important settings that you should pay special attention to:
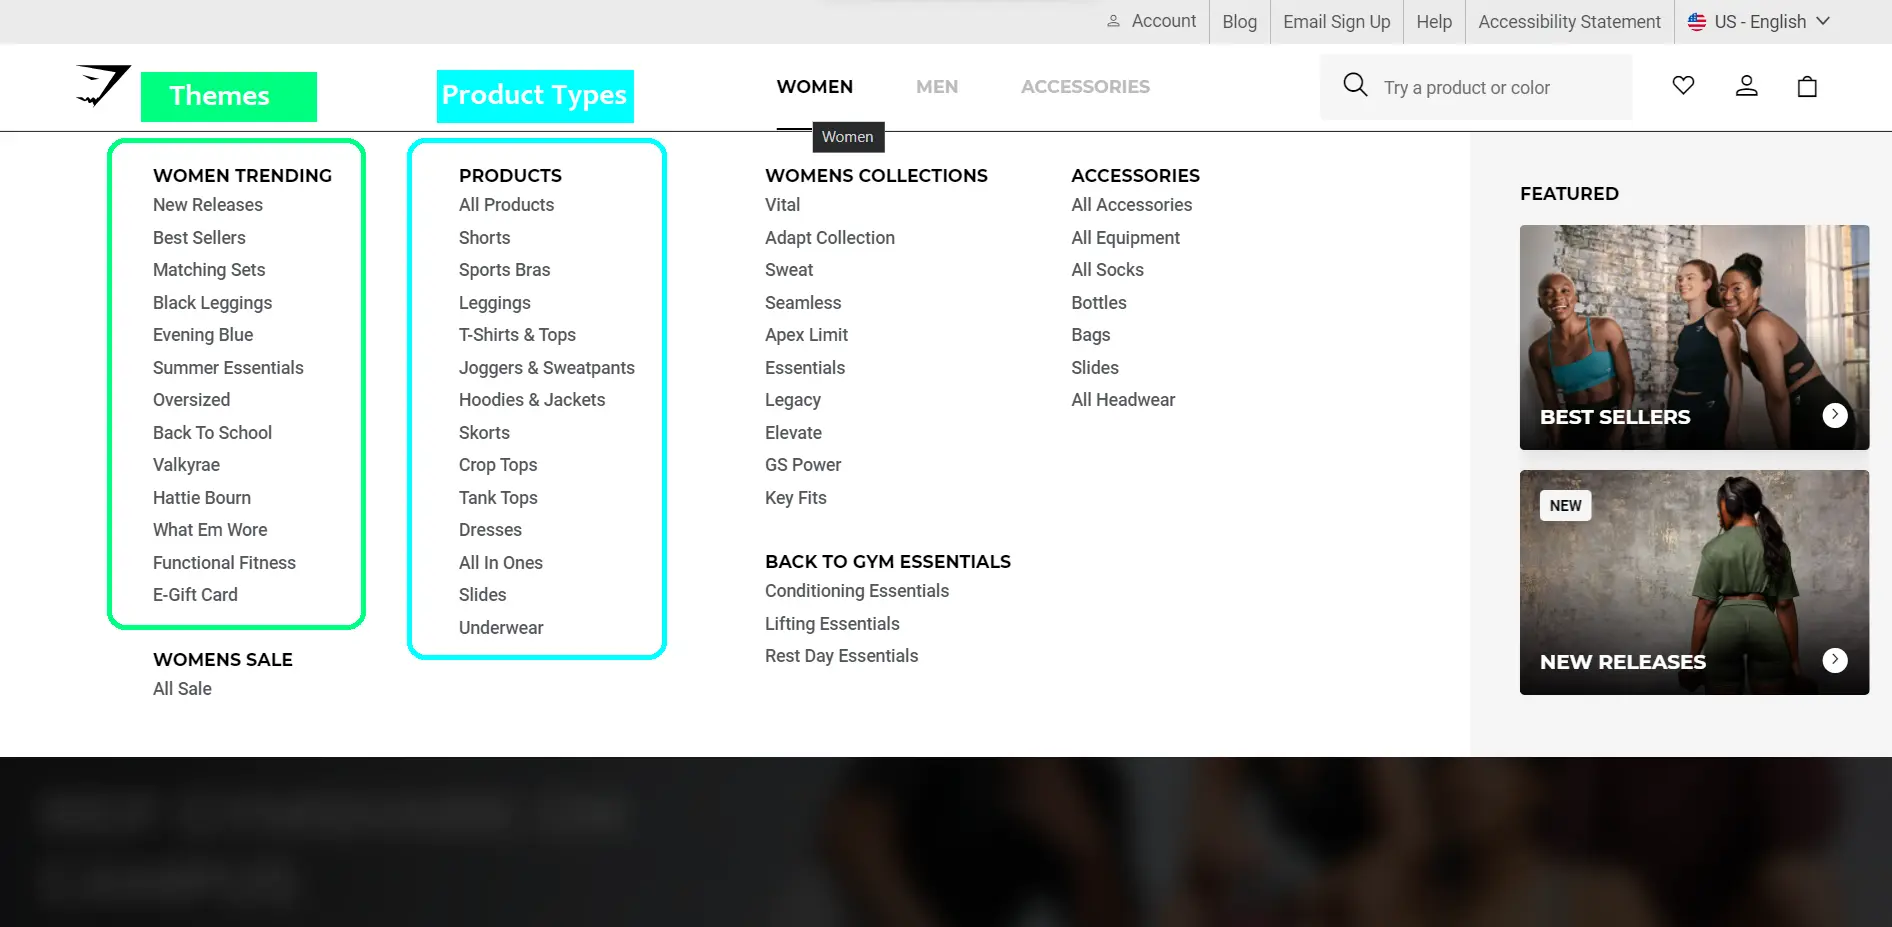
Store details, Payments, Checkout, Shipping and delivery, Taxes and duties, Locations, Markets, Domains, Brand, Notifications, and Policies.
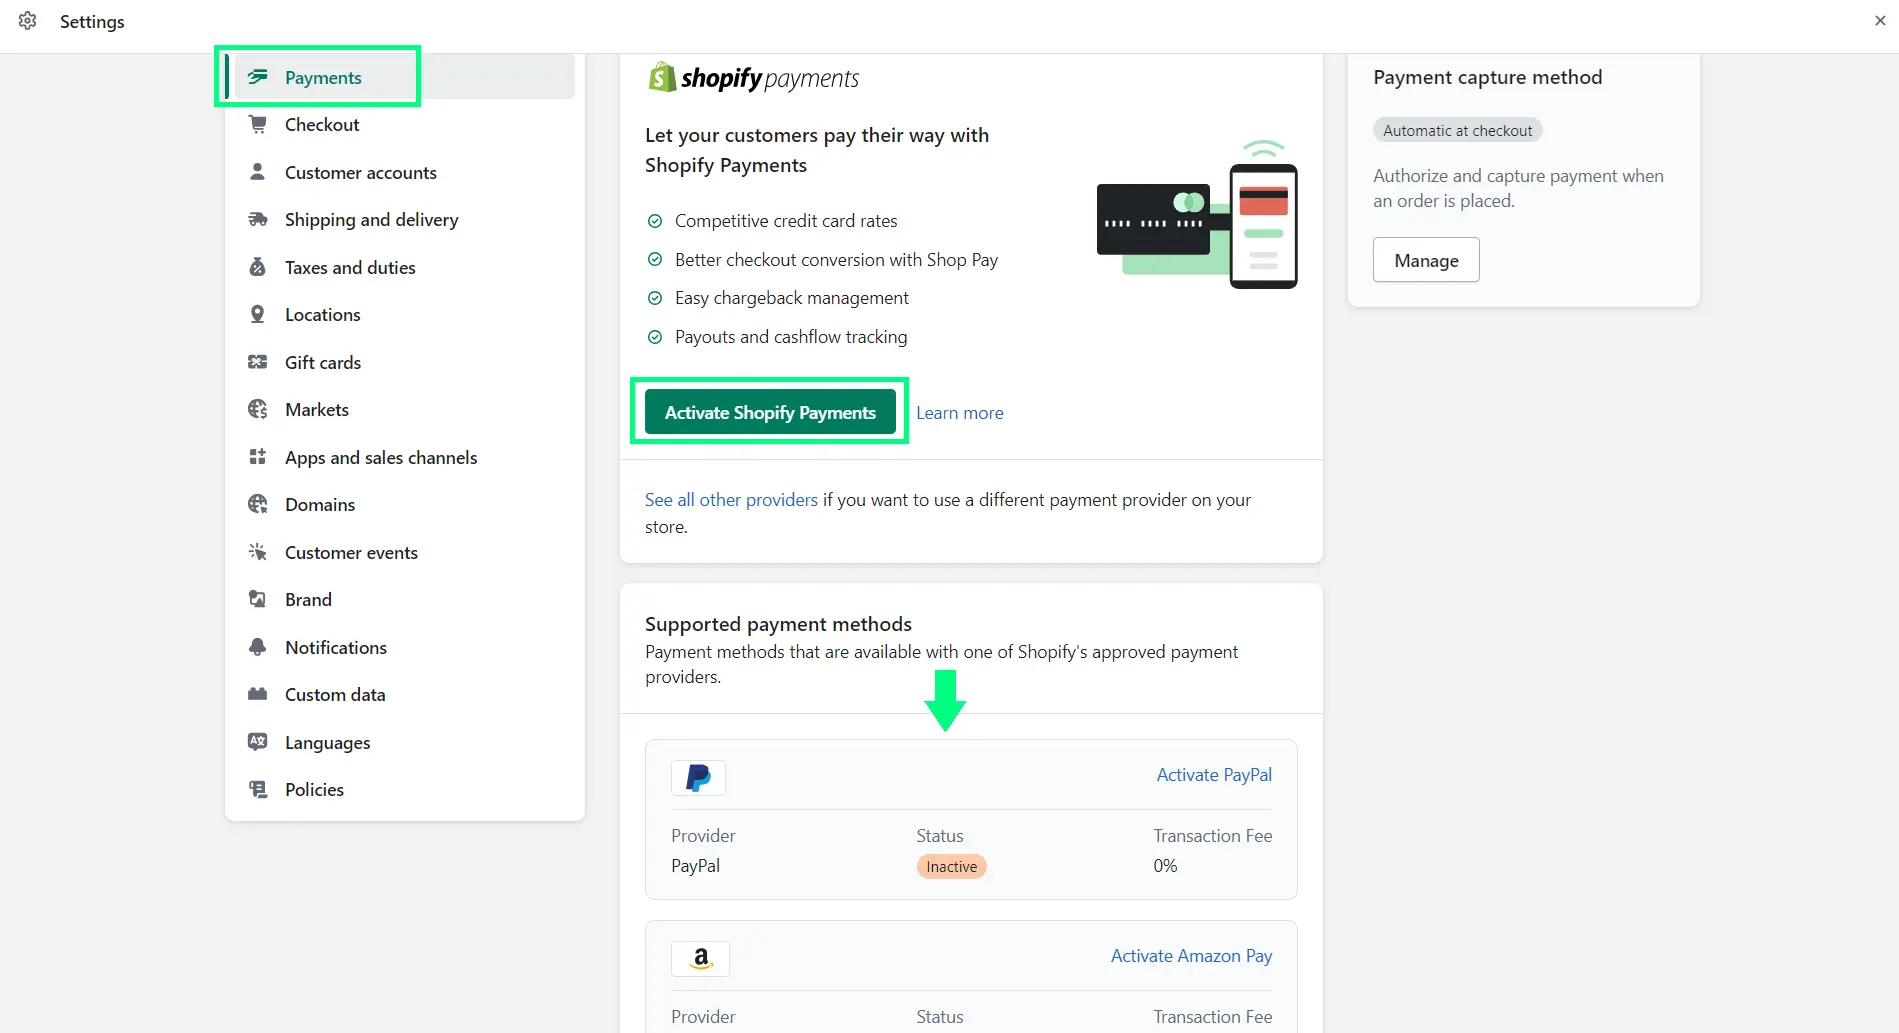
Payments: Set up the payment provider(s) you want to use to collect payment from your customer.
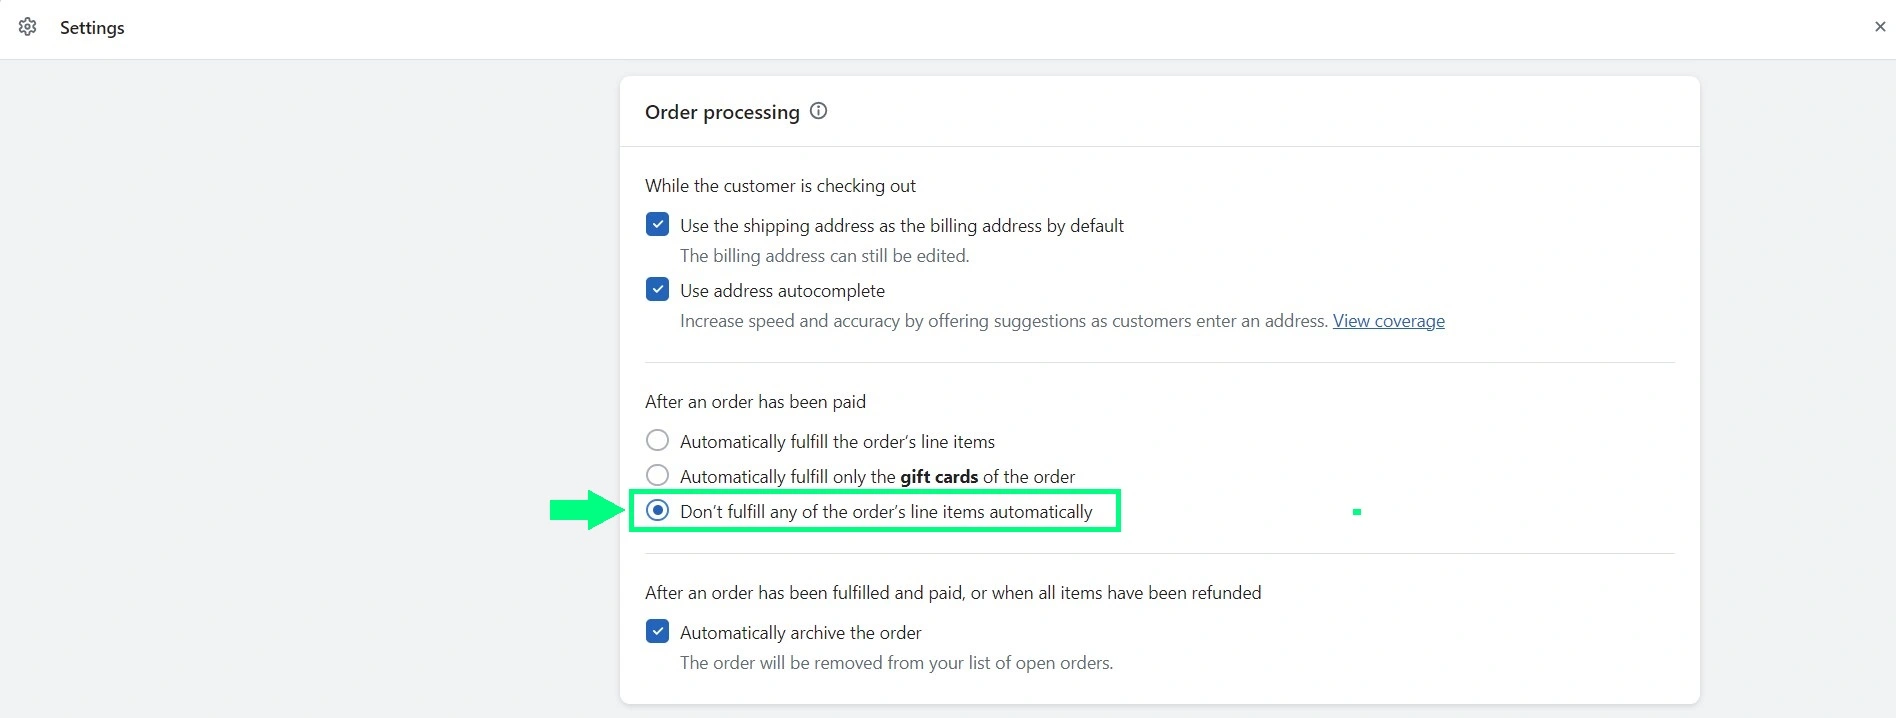
Checkout: Checkout is one of the most important aspects of an online store. Make sure to customize your checkout page. Also, as a best practice, keep the option “Don’t fulfill any of the order’s line items automatically” enabled so that you can review the order before proceeding with fulfillment.
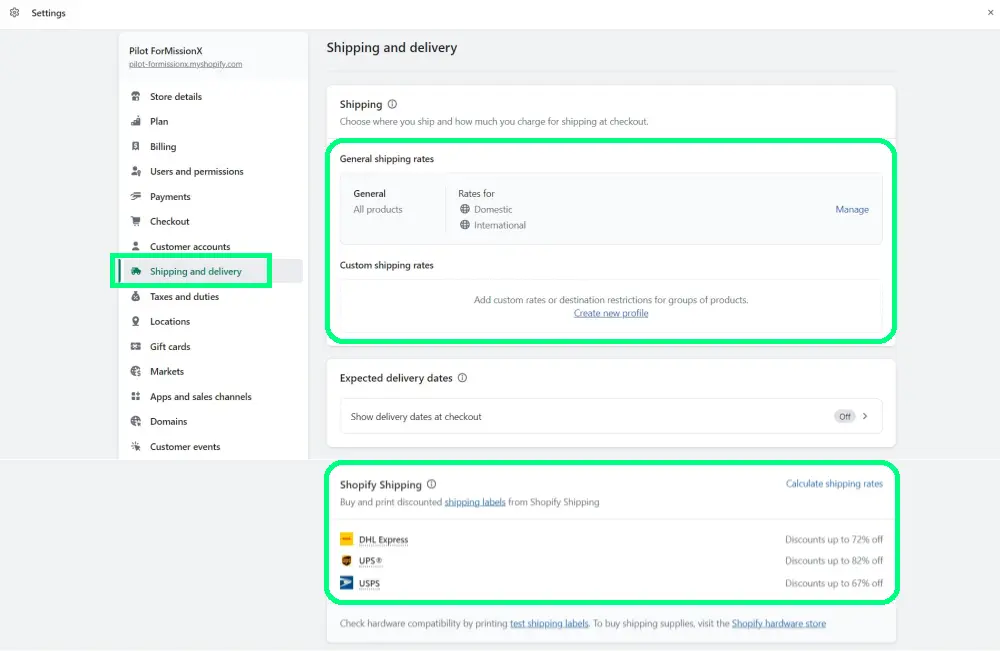
Shipping and delivery: Make sure to set up your shipping zones correctly based on the counties where you want to sell your products. Also, if you’re eligible for Shopify Shipping, you can take benefit of discounted rates from certain shipping carriers.

Taxes and duties: Disclaimer: I’m not a legal professional or a tax consultant. For any professional advice on this subject, you should consult a legal professional.
Honestly, for me, this was one of the ‘scariest’ steps of all. It took days for me to research how taxes work and all. But then I realized this is something I could’ve done after launching my store instead of delaying the launch for days. I was unnecessarily worrying about how I would pay taxes even before I got my first sale.
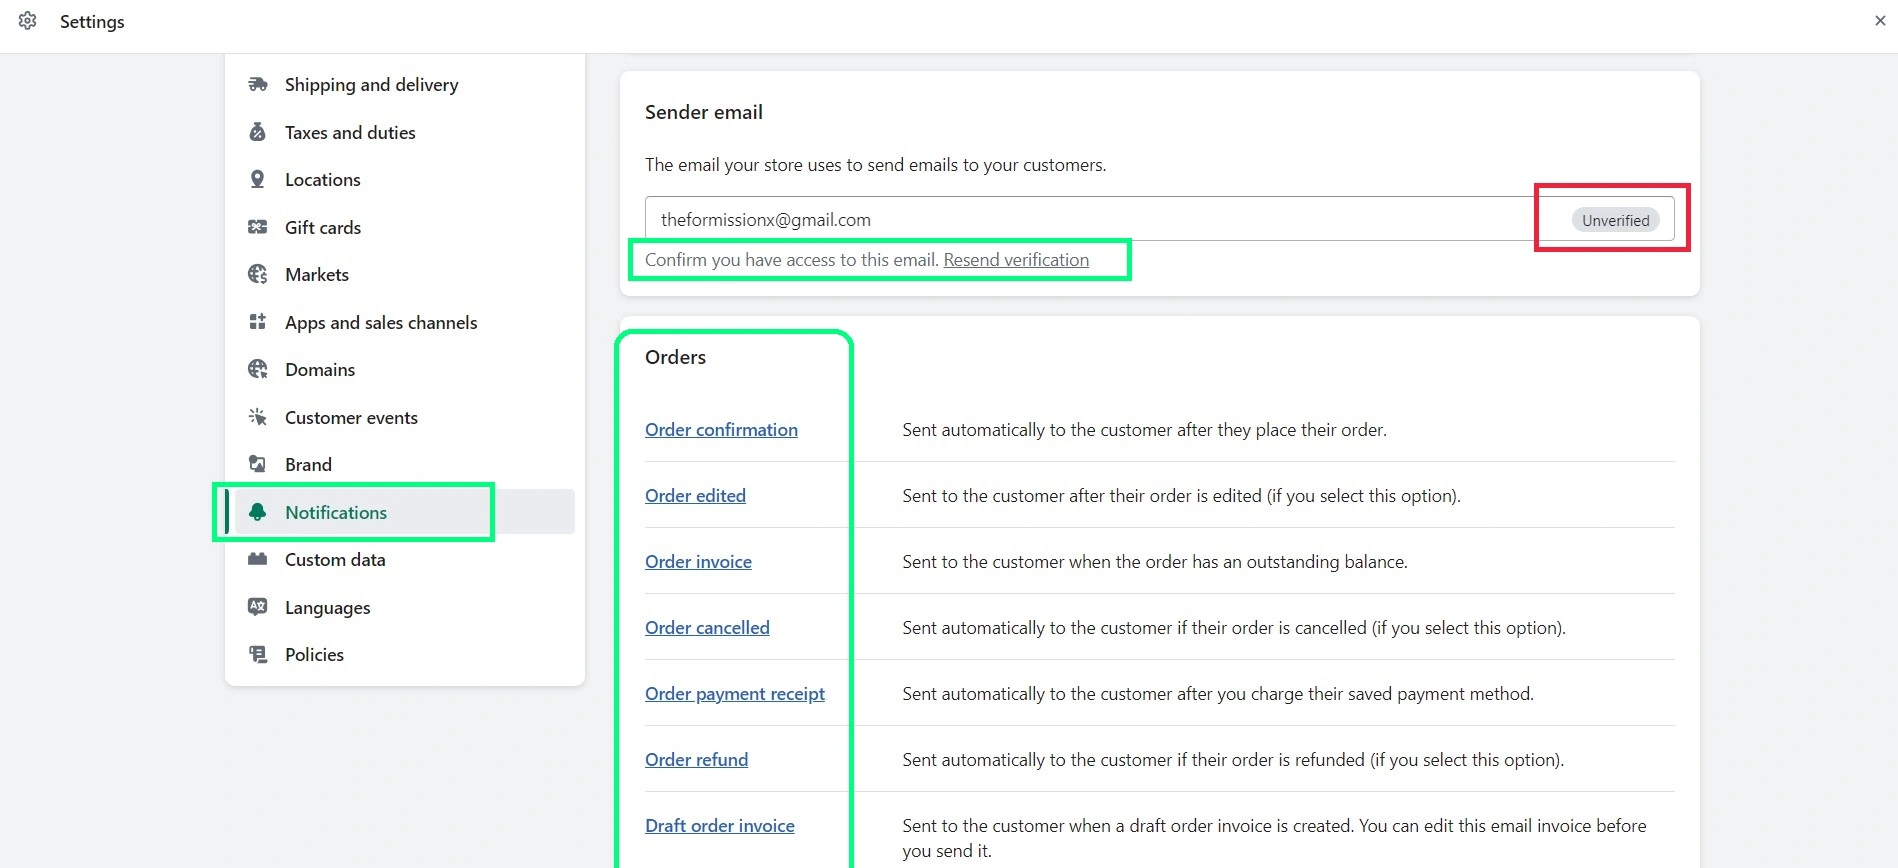
Notifications: 1. Use an email address ending with your domain name. It looks more professional and also reduced the chances of your email going into the spam folder. 2. Make sure your email is verified. 3. Customize your emails per your branding.

Policies: This one’s also a critical setting. For any online business, having robust policies is an important aspect. Shopify makes it easy for you to create policies with the help of templates. However, you need to review and edit those templates.
I did most editing by myself and then hired a professional attorney through Fiverr to review and edit my store policies. The Fiverr seller did an amazing job and helped me ensure that the required terms are covered in my policies.
Step #8: Select your theme and customize it
This is one of my favorite steps of all.
Why? It’s because customizing your theme is like giving personality to your brand. I love branding my businesses and this step involves a lot of branding.
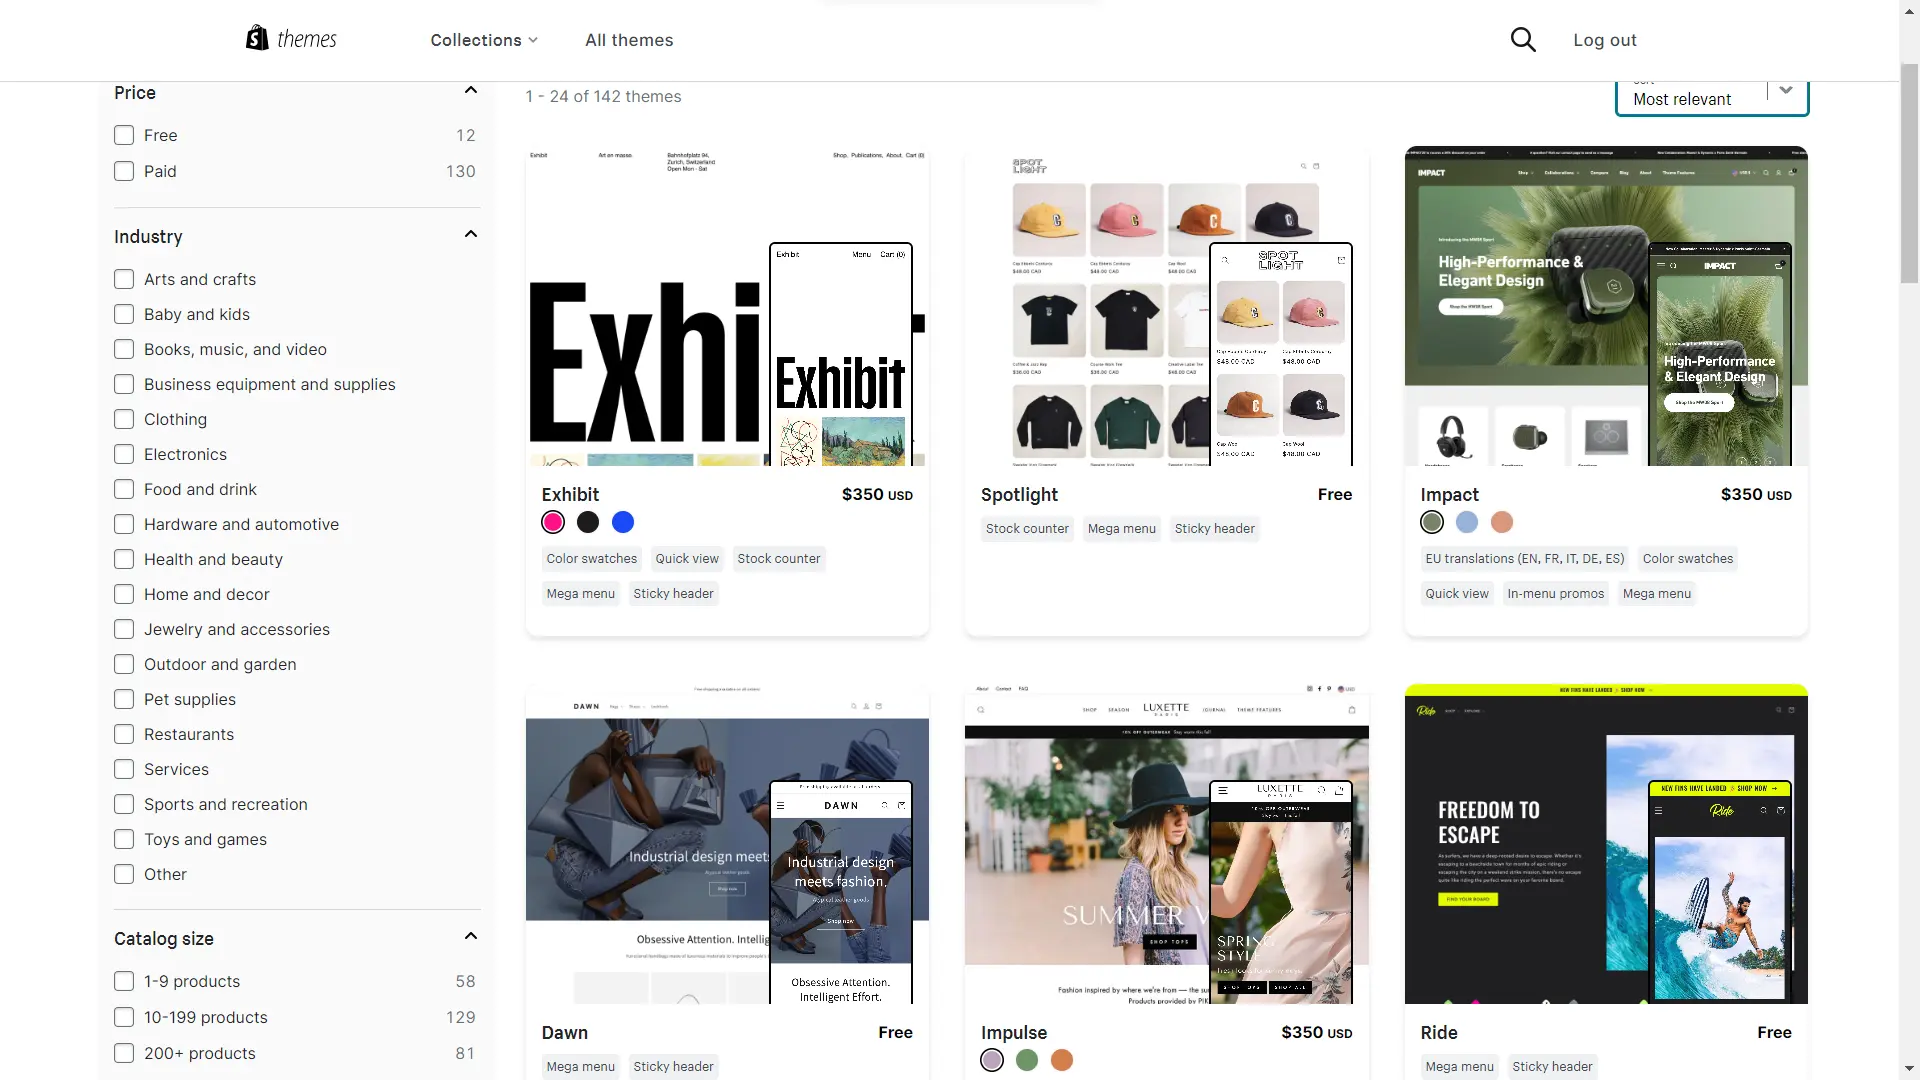
Explore Shopify’s theme store
By default, your store will have the “Dawn” theme — a free but nice theme from Shopify. However, Shopify also has many other free and paid themes to design your store.
It’s crucial to choose the right theme that matches your branding and business requirements.
In the Shopify theme store, you can filter and view themes based on specific criteria such as price (free/paid), industry, catalog size (# of products), and features.
Check out demo stores or try it out!
You can view the demo stores created by theme developers to get an idea of the theme layout. Some theme developers would also showcase the real business websites created using their theme.
Also, theme reviews left by other merchants can be helpful to know about their experience of using the theme.
If you want to try a paid theme, you can simply install the theme using the “Try theme” option. You’ll need to pay only if you publish the theme.
Helpful Tip: Be careful with your investment in a theme!
Paid themes are great. They can give your store a premium design.
To be honest, I purchased a paid theme and I loved it. But later on, I realized I could’ve gone with a free theme in the beginning.
Especially if you’re starting your business with a small budget, it’s good to start your store with a free theme. There are some nice and fast free themes that can help you design a store with no additional cost.
Build your business first. Start generating revenue. And then, you can go for the paid theme of your choice.
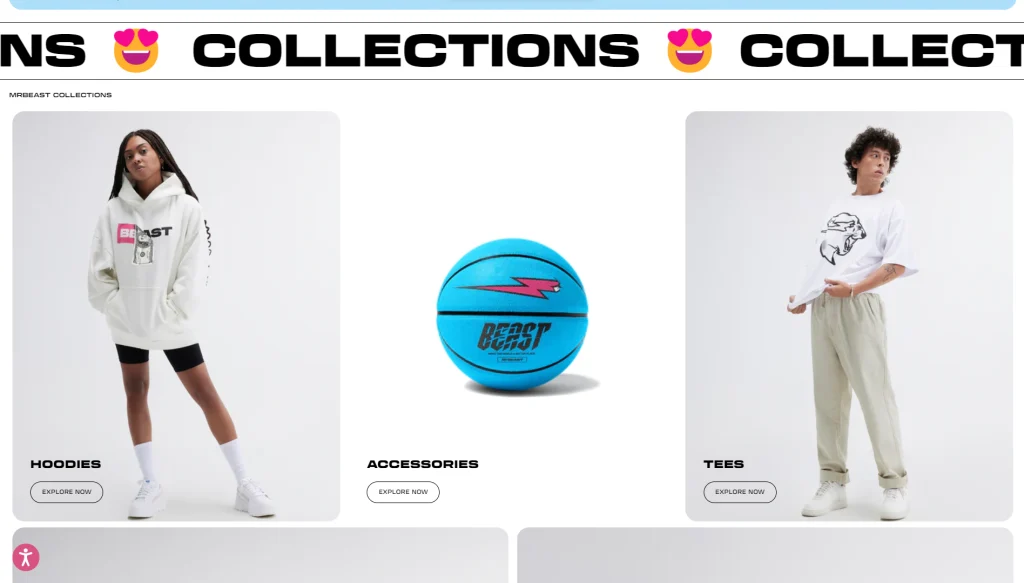
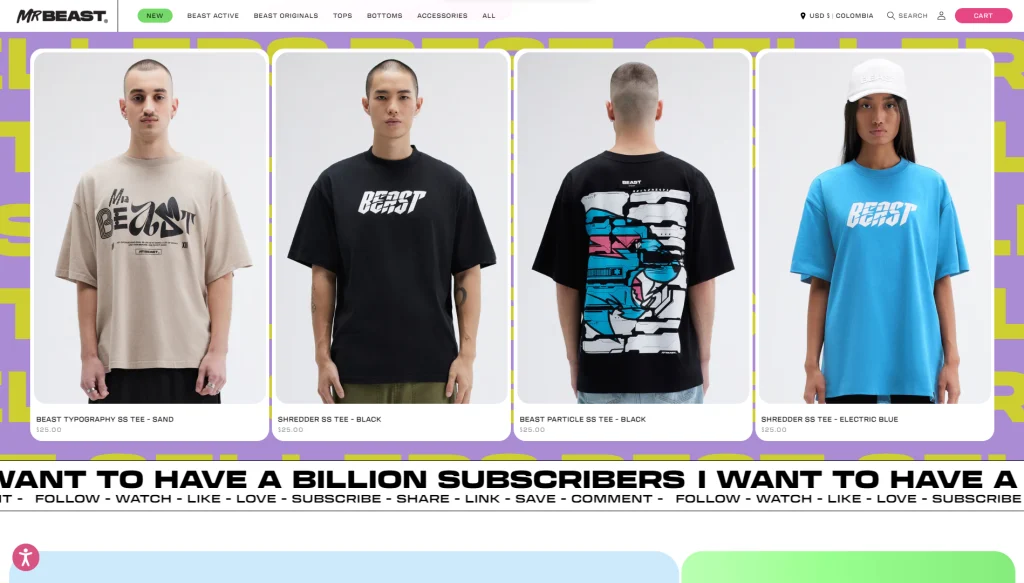
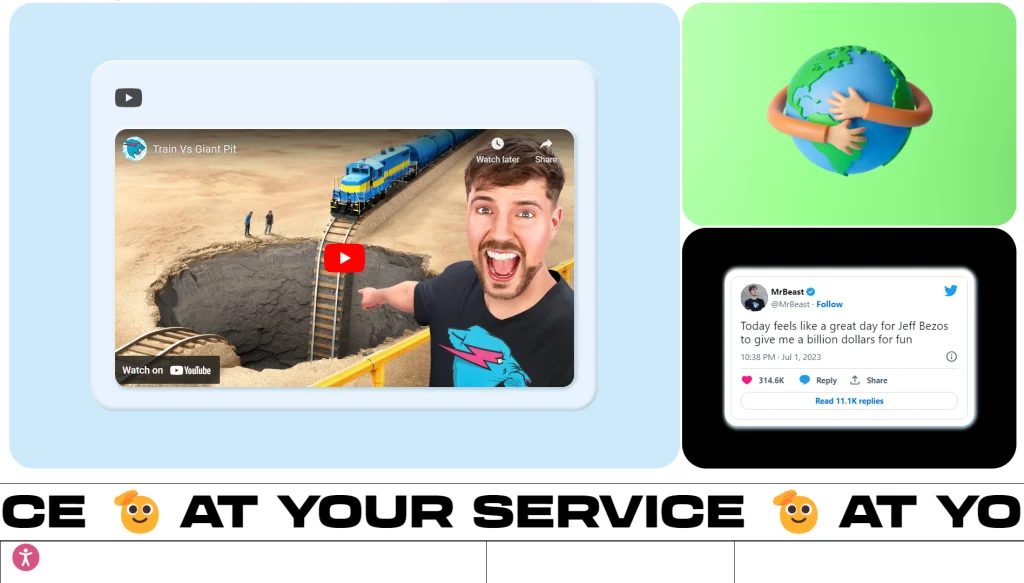
Here’s an interesting fact, one of the biggest YouTube content creators in the world — Mr. Beast — uses a free Shopify theme on his store, i.e., the Publisher theme.


Customize your theme:
Once you’ve installed your favorite theme, you may start customizing it. Give your store branding using a cohesive color scheme and incorporating other visuals and content.
Using the Shopify theme editor, you can design and customize different sections of your store pages.
Step #9: Install Shopify apps as necessary
Shopify apps enable you to add more features and functionalities to your store.
Whether you are looking to enhance your store’s design, marketing, and customer service or you need help with product sourcing or fulfillment—there are thousands of apps available serving different purposes.
Like themes, you may explore different apps and test them. Most apps offer either a free version or a free trial for a certain number of days.
Also, you can get some insights from merchant feedback by looking at their ratings and reviews in the Shopify app store.
| Function | Importance | Recommended Shopify App(s) |
|---|---|---|
| Email & SMS Marketing | Must | Privy, Omnisend, Klaviyo |
| Product Reviews | Must | Judge.me, Loox, Ali Reviews |
| SEO | Must | Booster, Avada, SearchPie |
| Customer Support/Live Chat | Must | Willdesk, PingMe, Tidio |
| Affiliate Marketing | Optional | UpPromote, Referral Candy, Goaffpro |
| Store Backup | Optional | Rewind Backups |
| Loyalty Program | Optional | Growave |
Step #10: Finalize your pricing strategy
Here comes one of the most significant factors that will directly impact your revenue and profit — the pricing.
I highly recommend completing this step before you move forward with the next step, i.e., product listing. You don’t want to go back and edit pricing after creating all of your products. It’ll add more work to your to-do list.
While deciding on the pricing of a physical product, you may need to consider multiple factors such as:
- The base price of the product
- The cost to create a product or to get it from a supplier
- Packaging and shipping cost
- Decide whether you’ll offer free shipping or the customers will pay separately
- Estimated customer acquisition cost
- Marketing and advertising cost
- Platform fees
- Shopify’s transaction fees and payment gateway fees
- Taxes if applicable
- Profit margin
- Decide what % of margin you want to keep considering discounts that you’ll have to offer
On top of all these factors, one more thing that you should consider is your competitor’s pricing. You don’t have to offer the same or lower price; however, it’s helpful information for your overall strategy and positioning.
Step #11: Product Listing & Collections
Now comes the part that’s going to sell — your products.
This step needs to be handled based on your store type and product range. Let’s say you’re starting a one-product store or with only a few products, there’s not much to set up.
But if you’ll be selling hundreds of products in multiple categories — a clothing store for example — you need to keep the user experience (UX) in mind. It could be helpful to prepare a collections map where you categorize and structure all of your collections.
By adding specific tags, you can automate those collections.
For example, here’s what a collections map looks like, and you can use a similar structure for your collections as well.

Creating well-structured collections will help your customers to navigate through all your products easily. And they’ll be able to quickly find what exactly they’re looking for. Ultimately, this will help you keep them on your website and explore more of your products.
One of the most famous brands (powered by Shopify) — Gymshark — has organized its collections based on different themes, product types, etc.
Step #12: Prepare Your Store Policies
This section is actually a part of your Shopify settings; however, I still wanted to cover this separately as it’s a highly critical one.
Overview of the store policies
Running an online business comes with certain responsibilities as a website/business owner. Store policies provide complete transparency to your customers and protect your business from fraudulent activities.
These policies include a Refund Policy, Privacy Policy, Terms of Service, and Shipping Policy. You may also create a separate Returns policy or cover it within your Refund Policy. I prefer to keep them both separate.
Plus, the contact information if you’re planning to sell in the European Union.
Create and edit store policies from templates
All of these may sound like technical stuff, but Shopify makes your job much easier by providing standard policy templates. These templates can give you a great starting point to create your policies.
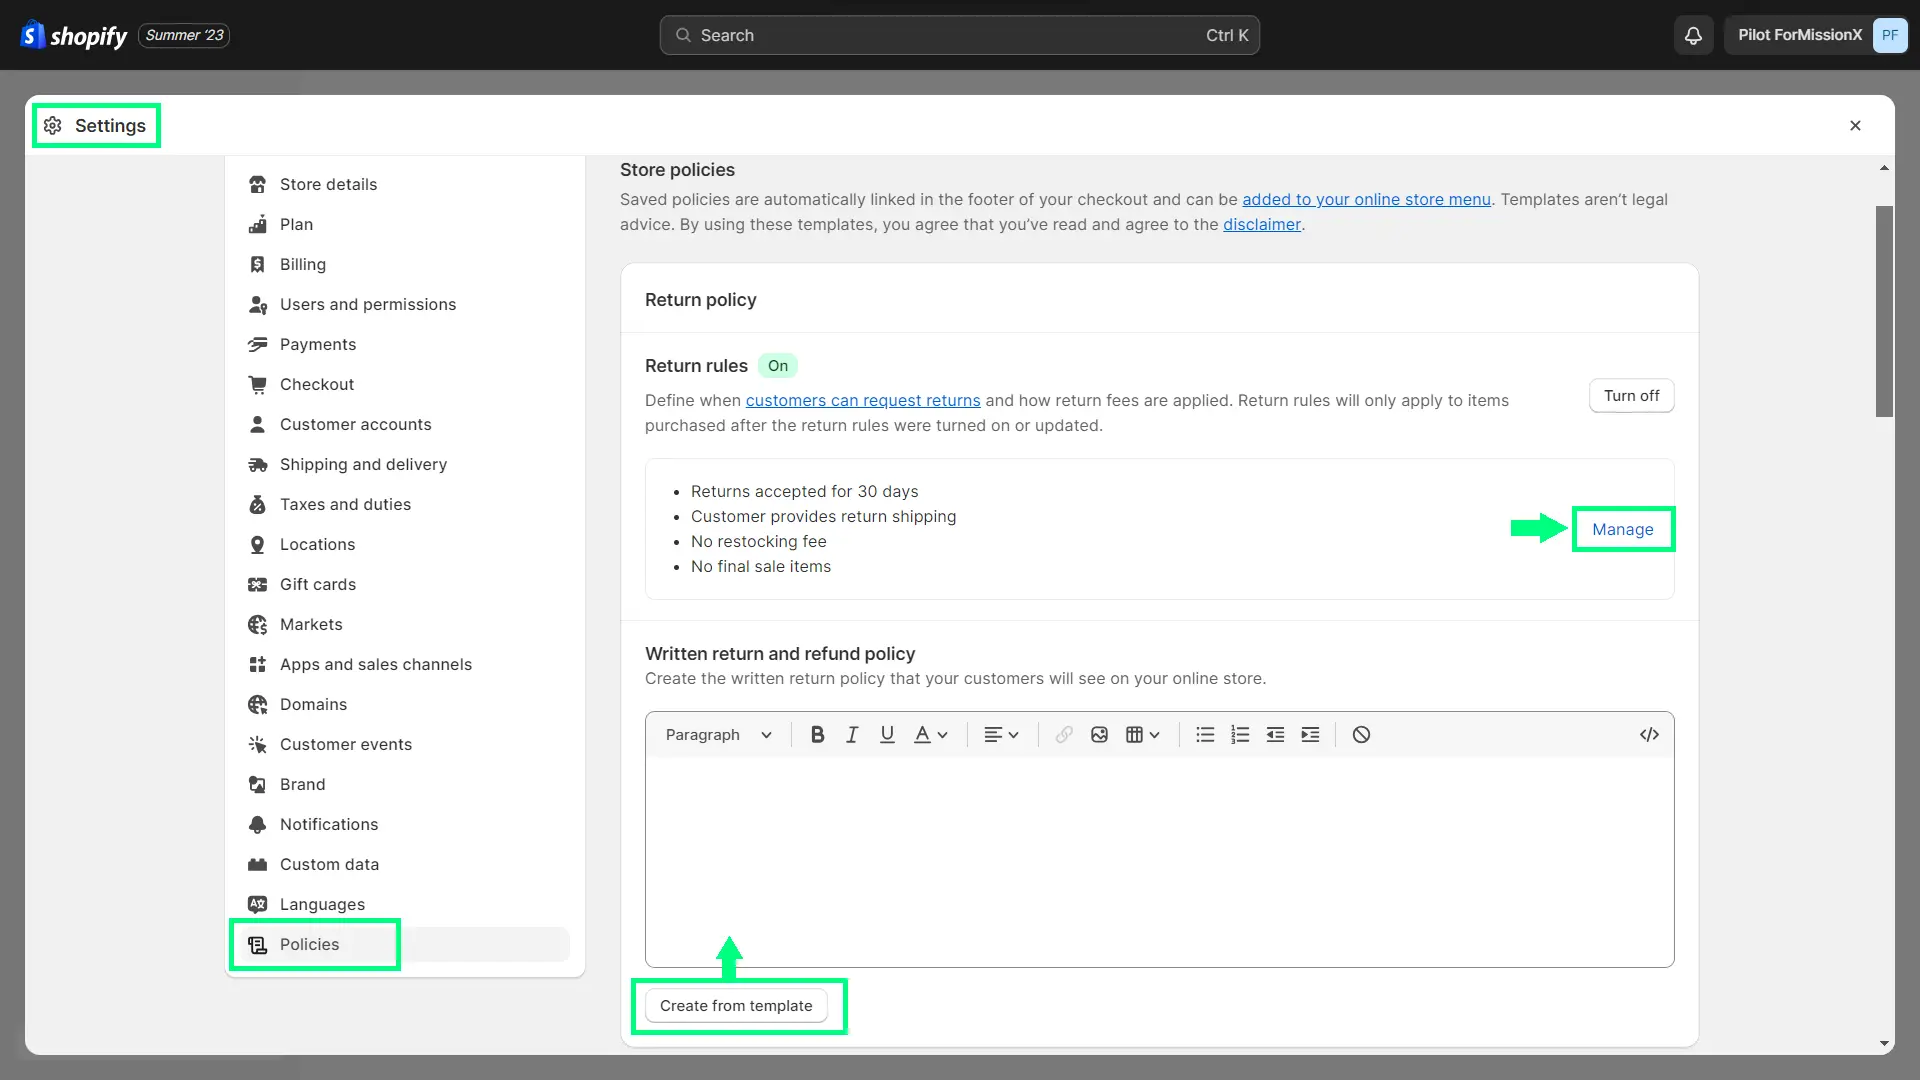
Click on the “Create from template” button to generate the initial drafts of your policies. Go through them, and see what are the section in those policies that need to be edited/changed.
These detailed templates cover the most common terms for online businesses; however, they MUST be edited before publishing. There could be some terms that you may want to exclude from your policies or add others that are not available in these templates.
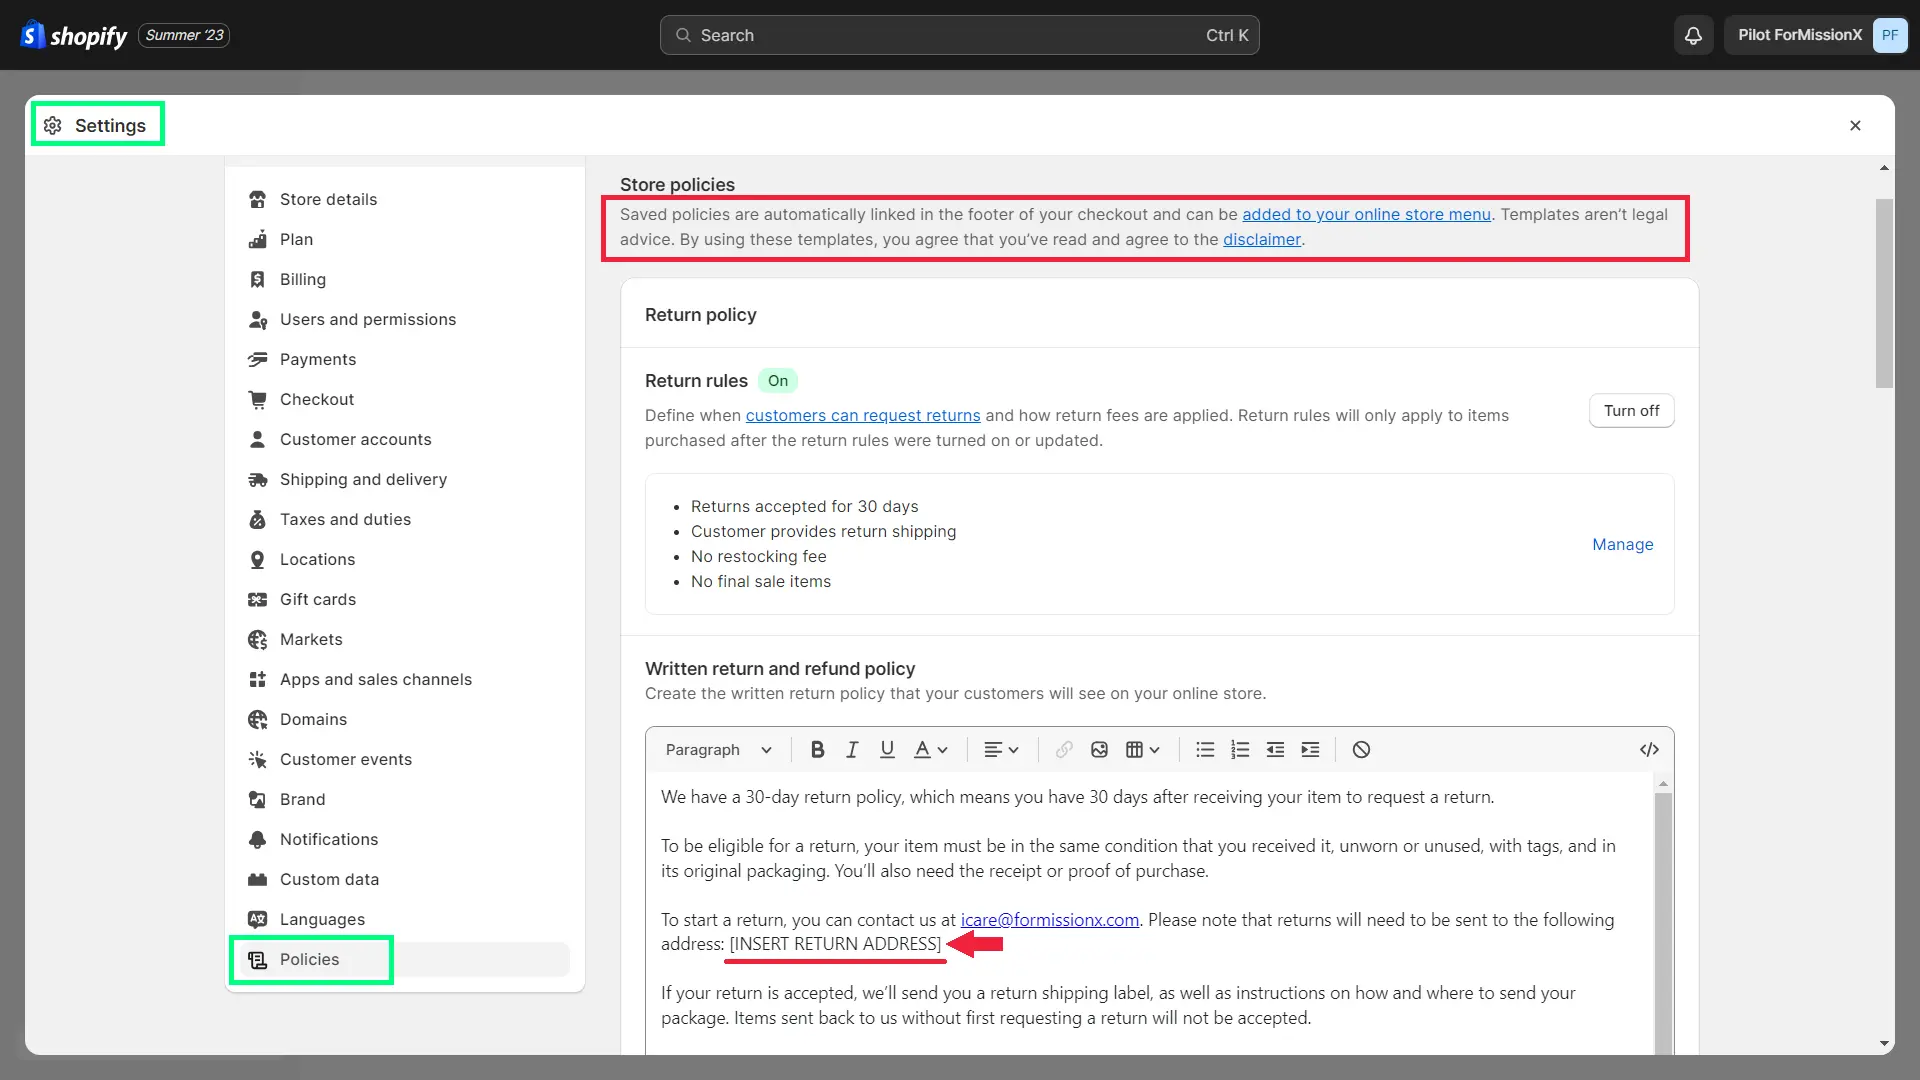
Create a Shipping Policy from scratch
You’ll notice all the store policy sections have a button to generate a template, but the shipping policy doesn’t have any such option.
To create robust store policies, you may also take help from legal experts depending on your budget.
Step #13: Search Engine Optimization & Analytical Tools
Once your store would go live, bringing traffic to your website would be one of the most challenging aspects of your business. So, you need to prepare yourself (meaning, your website) to be SEO-friendly.
Submit your sitemap to Google.
Submitting your sitemap to Google is fundamental to making your website appear in Google search results.
To submit it, you first need to create a Google Search Console property using your Google account.
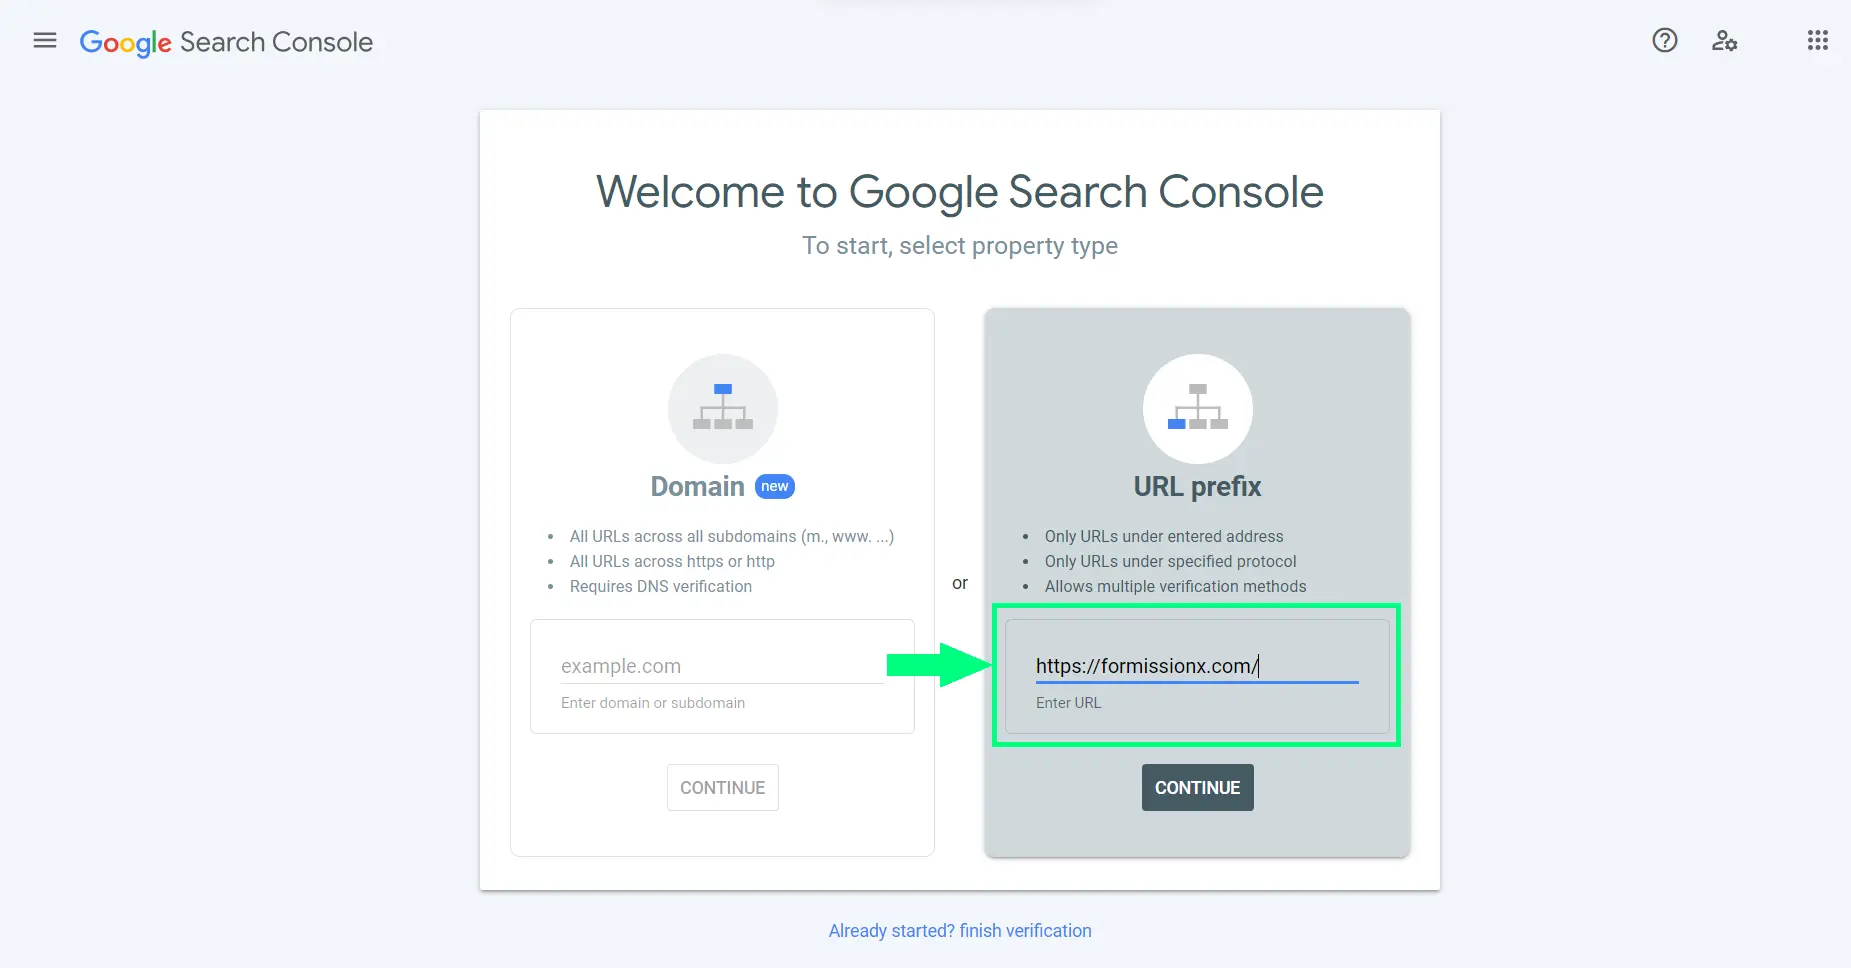
Make sure you have chosen the right Google account before creating the property. Under the URL prefix section, enter your website URL and click CONTINUE to proceed with property creation.

Once you’ve created the property, go to Sitemaps from the left sidebar. Insert sitemap.xml after your website URL and click SUBMIT. Once the sitemap is submitted successfully, it’ll show the status under the Submitted sitemaps section.
Configure Google Tag Manager & Google Analytics 4 (GA4).
Also, to grow your business, you should already have or develop a data-driven approach. Free tools such as Google Tag Manager and Google Analytics help you with very important data points or stats about your website’s traffic and conversions.
Step #14: Review and test your store
Once you have set everything up, review if any critical aspect is missing or needs to be revised or corrected. This step would require an eye for detail.
Try a couple of test orders.
You can place test orders by enabling the test mode in your payment gateway settings (Go to “Settings > Payments” in your Shopify admin).
By placing test orders, you could review the entire sales flow. Visit your store from another browser (where you haven’t logged in to your Shopify admin) or use an incognito window.
When you place any test order, review the entire process from a customer’s standpoint. Check if you are receiving all the notification emails (e.g., welcome email, order confirmation email, newsletter email, etc.)
Check if the payments went through successfully. Once testing is completed, you can delete those test orders after moving them to archived orders.
Step #15: Launch the Store
FINALLY!
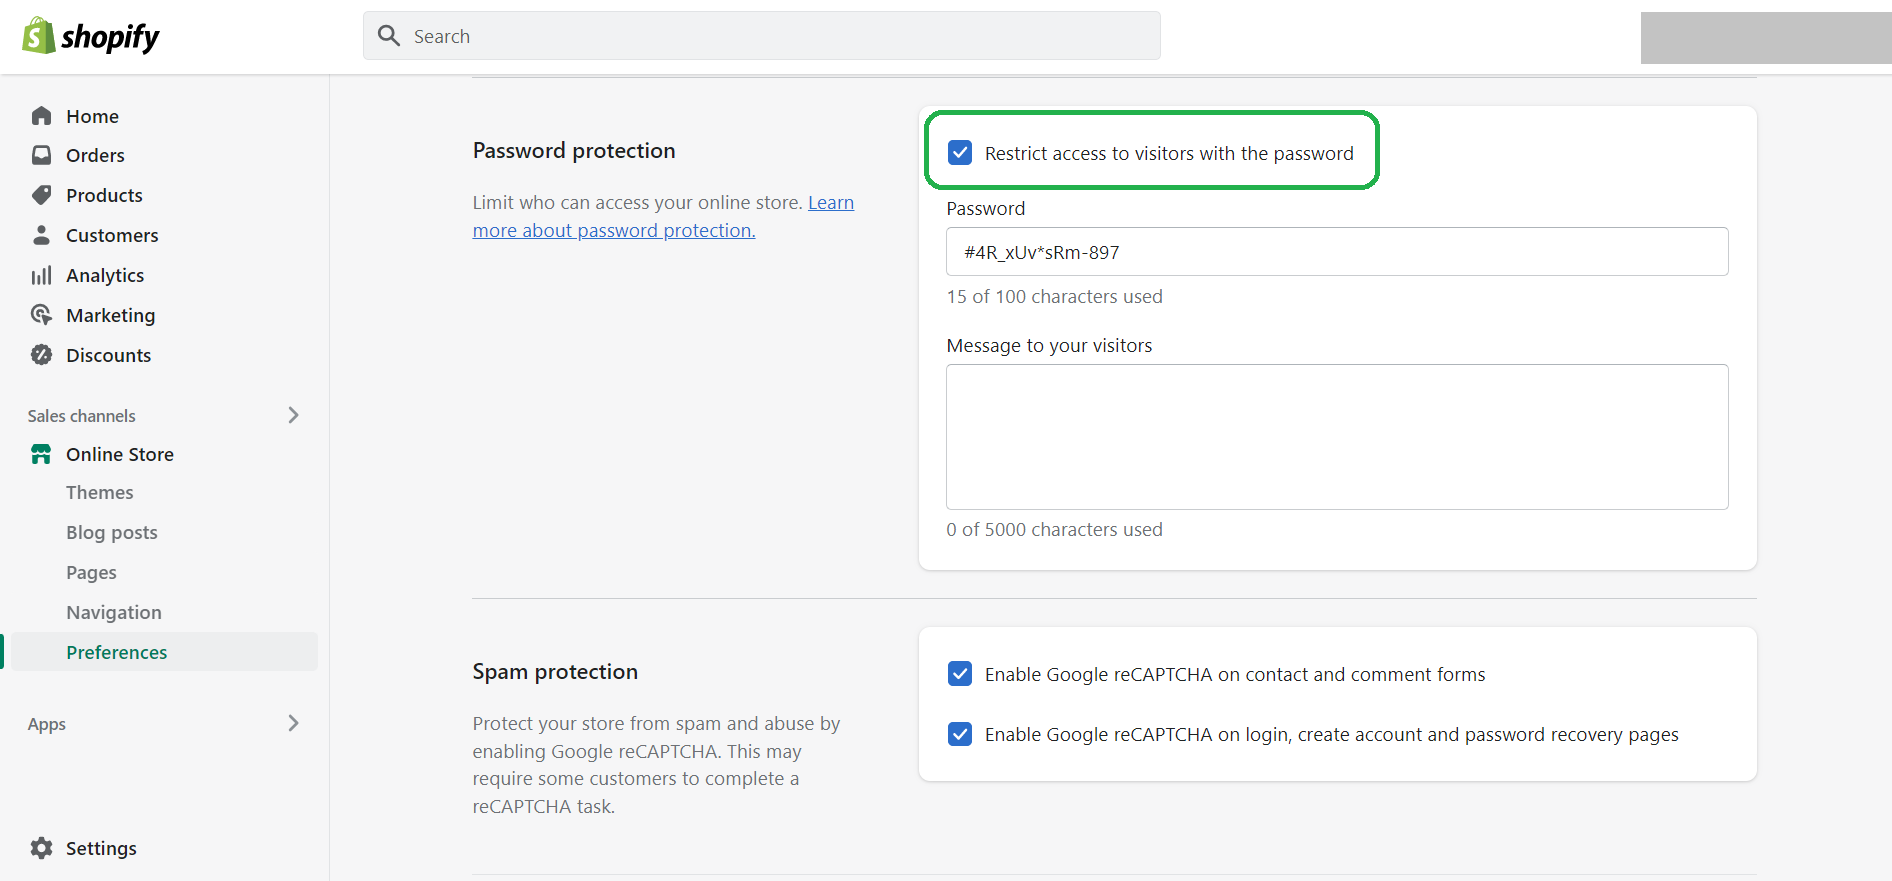
Once everything is ready to go, it’s time to remove that password from your store and officially launch your website.
Side note: It’s okay if your website or store is not perfect yet. You can do further enhancements even after the launch. In fact, it’s an ongoing and never-ending process.
So, keep a certain timeline in mind within which you would want to launch your store and work hard to do so.
To remove the password, go to your Shopify dashboard > Sales Channels > Online Store > Preferences, and uncheck the box – “Restrict access to visitors with the password” and then click Save. Here’s a screenshot for your reference:
And congratulations, your store is live now! 🎊🎉🚀💫♾️
Post-Launch Steps
Step #16: Collect feedback from as many people as possible
Seeking feedback for your store is crucial.
But — I’m not talking about the feedback from your customers after they purchase your products.
Of course, feedback from real customers is the most important feedback. But you don’t need to wait for it.
Think of your family members and friends and list the ones that are:
1. similar personalities as your ideal customer and
2. open to sharing honest and constructive feedback.
You may specify certain aspects that you want them to observe and share feedback on it. For example:
- Pricing – Will you buy these products at given prices?
- User experience – How smooth was your experience when navigating and buying products?
- Product – How did you like the product? Was it worth what you paid for? Would you recommend this to anyone?
Again, questions must be answered from a customer’s standpoint, meaning, ask them to share genuine feedback without worrying about hurting your feelings.
Step #17: Marketing and promotions
Okay! So finally, the store has been launched after all these efforts, but the job isn’t done yet.
In fact, now we’ll move into the next challenge and that is to bring traffic to your website.
Prepare your strategy and allocate the budget
You need to have a proper strategy in place about HOW and WHERE you’re going to market your product.
There are many different ways and they have their own pros and cons.
Cost-effective marketing strategies (This takes time though!):
- Content Marketing: Start a blog, create videos, etc.
- Social Media Marketing: Select the social medial platforms where your target audience is, start posting relevant content, and engage with them.
- Email Marketing: Build an email list and promote your products with helpful email content.
- Search Engine Optimization (SEO): Optimize your content with relevant keywords and follow SEO best practices.
- Affiliate Marketing: Offer a certain % of the commission to people who promote your products to others and bring in sales. Meaning, you’ll need to pay only when get sales.
Paid ads or marketing strategies (Relatively quicker methods to get your initial sales.)
- Facebook & Google Ads: Facebook and Google are two of the most popular advertising platforms for eCommerce entrepreneurs as they allow them to run ad campaigns at a reasonable budget.
- Influencer Marketing: Find micro-influencers in your niche, meaning emerging influencers who have a moderate following. You can reach out to them easily, promote your products with a low budget, and earn a high return on investment (ROI).
The lessons from a failure!
To be honest, this was the key area where I failed in my business due to falling short of the budget. And that was one of the reasons, I emphasized the budgeting and planning phase right in the beginning.
Apart from that, another mistake I made was the delay in asking for feedback. Although I’ve got a bunch of helpful friends, I just couldn’t ask them — in a timely manner.
After working hard for months and spending a lot of money, seeing your business dying is tough and difficult to express. But do I regret starting my first eCommerce business?
Nope. Not at all.
I couldn’t have learned everything in a better way.
And it was just the beginning. I’m yet to create more eCommerce businesses through Shopify.
I believe failures are the greatest lessons of life.
So, make sure you don’t make these mistakes.
You need to bring potential customers to your website, convert them into your actual buyers, and start generating revenue.
You can develop a strategic approach toward marketing and promotions based on the phase of your business. This could be an entire topic that we could go into detail about, but for now, let’s keep it simple.
I’ll divide it into two phases:
Initial Phase: Raise your brand awareness
In the initial phase, one of your primary aims should be to make people aware of your brand, its story about how it came into existence, and what is the purpose or mission of your brand.
And by bringing all these aspects in front of the people, ultimately, you can convey what your brand has to offer to them. On top of all these, you can introduce some launch-special offers as well to entice potential customers.
Social media marketing is something that you should utilize to its fullest extent to raise your brand awareness.
Phase 2: Conversion-oriented marketing and promotions
Once you have put in the effort to raise your brand awareness, you can take your marketing to the next level.
You may use different marketing methods depending on your budget, such as content marketing, email marketing, paid advertising, UGC (User-generated content) marketing, influencer marketing, and so on.
Don’t keep waiting! Start an online business with Shopify now.
Okay. So, that’s it for this tutorial! I hope you found it helpful.
While launching your first online store may seem like a lengthy process, I’m sure you’d thoroughly enjoy it—as long as you love your core business idea.
During this entire process, you might get stuck on some things. Or things might not go as planned. But in any situation, don’t feel discouraged.
I’m sure you’ll figure things out — either on your own or with the help of the community or other experts.
In the eCommerce world, you need to raise your game of problem-solving!
Keep in mind — results may take time but your efforts shouldn’t.
After all, entrepreneurship is all about passion and perseverance—through all ups and downs. And one last thing now — never ever give up.
Your comments would mean the world to me.
Please let me know in the comments — what specifically you’d like to learn more in detail about Shopify?
It will help me create more helpful content for you.
